

 Z
Z
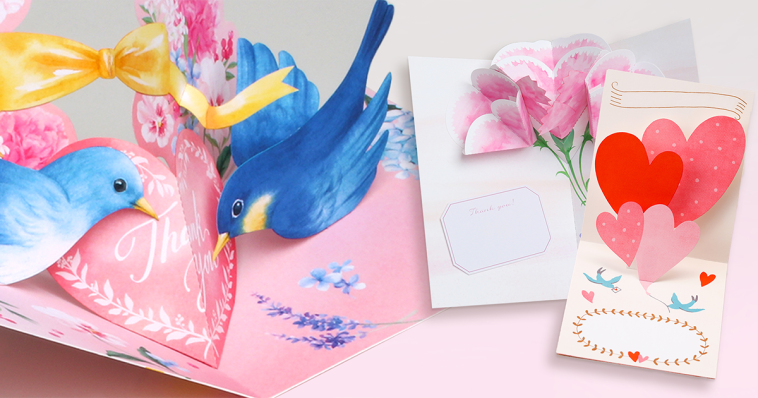
Handmade birthday cards have always been one of my favorite ways to show someone how much I care. They carry a personal touch that no store-bought card can replicate. And when it comes to making those cards stand out, nothing is quite as fun and impressive as a pop-up card. Learning how to make a pop-up birthday card has not only elevated my DIY skills but has also delighted friends and family with its surprise element and charming creativity.
A pop-up birthday card transforms a flat greeting into an interactive experience. Whether the pop-up reveals a birthday cake, a bouquet of flowers, a fun phrase, or a favorite character, this small gesture adds excitement to the card-opening moment. With just paper, scissors, and a bit of patience, I can design unique cards that are artistic and memorable.
If you want to master how to make a pop-up birthday card, this guide walks you through every step, from materials and templates to cutting techniques and decoration tips. It’s easier than you might think and completely customizable for anyone you’re celebrating.
Supplies You Will Need
To get started, I gather the basic materials needed for a pop-up birthday card. Many of these are already in my craft stash:
- Cardstock or thick paper in multiple colors
- A ruler and pencil
- Scissors or a craft knife
- Glue stick or double-sided tape
- Markers, gel pens, or colored pencils
- Stickers or embellishments for decoration
- A cutting mat (optional but helpful for precision cuts)
I choose a base cardstock color for the outer card, and another for the interior pop-up elements. Thicker paper provides the structure needed for the pop-up to stand and fold properly.
Planning the Card Design
Before cutting anything, I like to sketch a simple layout of the card on scrap paper. This helps me visualize the pop-up feature and decide what I want to include. Some popular pop-up birthday card themes I’ve made include:
- A three-tiered birthday cake with candles
- Balloons popping up from a gift box
- A smiling sun with a birthday banner
- A pop-up number to mark a milestone age
- A message like “Happy Birthday” in 3D letters
Once I know what I’m aiming for, I decide where on the card the pop-up will appear. Most pop-up designs sit in the center fold, but you can experiment with side folds or multiple layers for added impact.
Measuring and Cutting the Base Card
To form the base of the card, I cut a piece of cardstock to about 10 inches by 7 inches, then fold it in half to create a 5 by 7 inch card. This size is perfect for mailing and fits well into standard envelopes.
With the folded card in front of me, I use a pencil and ruler to mark the location for the pop-up. For a simple box-style pop-up, I draw two vertical lines from the folded edge, each about 1 inch long and spaced an inch apart. I repeat this process to create multiple pop-up tabs depending on the design.
Once the lines are drawn, I cut along them with scissors or a craft knife. Then I gently push the cut tab inward, folding it into the card so that it stands when the card opens. This creates a small platform on which to attach the pop-up design.
Making the Pop-Up Element
After creating the inner tab, I make the object or message that will be the star of the card. For example, if I’m making a pop-up birthday cake, I cut out three rectangles in different colors, stack them like tiers, and decorate them with markers and small dot stickers for icing and candles.
If I’m doing balloons, I cut out oval balloon shapes and add paper strings using thin strips of paper or draw them in. I glue these pieces onto the front face of the pop-up tab so that they appear to rise when the card opens.
It’s important that the pop-up item is not taller than the folded card or it won’t close properly. I always test this by folding the card shut after attaching each element to make sure nothing sticks out.
Decorating the Interior of the Card
With the pop-up in place, I move on to the rest of the interior. I often write a personal message, draw confetti with colored pens, or add extra elements like stars, candles, or party hats.
Some ideas I’ve used for inside decoration include:
- Drawing a table under a pop-up cake
- Creating a sky with clouds behind a pop-up sun
- Adding hand-lettered messages around the pop-up feature
- Gluing small buttons or gems for added sparkle
The goal is to create a cohesive scene that complements the 3D element and makes the card visually exciting.
Creating the Card Cover
I believe the outer design of the card is just as important as the inside. It’s the first thing the recipient sees and sets the mood for what’s inside. For the front cover, I use coordinating cardstock and decorate it to match the theme inside.
For example, if the inside features a pop-up birthday cake, I might draw a cake slice or write “Make a Wish” in colorful letters on the cover. If the pop-up is a bouquet, I sketch a few flowers and write “A Special Birthday for You.”
Adding borders, washi tape, or simple hand-drawn illustrations helps give the front a polished look. Sometimes I cut out shapes and layer them using foam tape to give the front a little 3D effect to match the pop-up inside.
Pop-Up Variations to Try
Once I learned the basics of how to make a pop-up birthday card, I started experimenting with different techniques and variations. Here are a few I’ve enjoyed:
Accordion fold pop-up
This style uses a strip of paper folded back and forth like a fan, then glued inside the card. Each fold can hold a balloon, candle, or even letters spelling “Happy Birthday.”
Cut-out windows
I’ve made cards where the cover has a small window showing part of the pop-up inside. When the card opens, the full design is revealed in an exciting way.
Layered pop-ups
Some of my favorite cards include more than one pop-up element. I’ve stacked pop-ups at different heights to create scenes with foreground and background layers, like a party table with guests and decorations.
Spinner pop-up
This fun technique adds a rotating piece attached with a brad fastener. It’s a bit more advanced, but creates a wow factor for the recipient.
Making Cards for Different Ages
One of the best things about learning how to make a pop-up birthday card is that the concept works for any age. I’ve made fun animal pop-ups for kids, elegant floral cards for adults, and cheeky humorous pop-ups for friends.
For toddlers, I stick to bold colors and simple shapes. For older kids and teens, I personalize the card with their favorite characters or hobbies. Adults appreciate thoughtful themes like nature, hobbies, or classic birthday elements done in a refined color scheme.
Customizing each card to reflect the recipient’s personality makes the gift feel even more thoughtful.
Useful Tips for a Clean Finish
After making many pop-up cards, I’ve picked up a few helpful tricks to make the process smoother:
- Use a bone folder or ruler to make sharp, clean folds
- Always test the fold and pop-up action before gluing everything down
- Don’t overload the pop-up tab with heavy embellishments
- Stick to lightweight paper for the pop-up element so it doesn’t collapse
- Allow glue to dry fully before closing the card
- Keep your cutting tools sharp for cleaner lines
Even simple pop-ups can look professional with a bit of precision and care.
Creating a Set for Gifting
Sometimes I like to make a few pop-up birthday cards at once and bundle them as a gift. I use different themes, colors, and pop-up features for variety. I tie them together with a ribbon and include envelopes so the recipient has a card ready to give to someone else.
This idea works great for teachers, parents, or friends who enjoy thoughtful stationery. It’s a great way to share creativity and encourage others to spread joy through handmade gifts.
Digital Tools for Templates
While I often draw my own designs, I also like using printable pop-up templates. These save time and give me a guide to cut more complex shapes. Some websites offer free downloads of birthday-themed templates like cupcakes, candles, and animals.
I print the template onto regular paper, trace the lines onto my cardstock, and then cut accordingly. Using templates makes it easier to produce consistent results, especially if I’m making several cards at once.
Why Pop-Up Cards Are So Special
I’ve given many types of handmade gifts, but pop-up birthday cards always get an extra reaction. There’s just something magical about opening a card and seeing a 3D element spring to life. It adds surprise, personality, and fun to something that’s usually flat and predictable.
Cards are often saved as keepsakes, and a pop-up design makes them even more likely to be displayed or treasured. Whether simple or elaborate, they always feel like a mini work of art made with heart.
Final Thoughts
Learning how to make a pop-up birthday card has become one of the most enjoyable parts of my DIY crafting journey. It’s a project that lets me play with paper, color, and storytelling, all while creating something meaningful for someone I care about.
No matter your skill level, you can create stunning pop-up cards that brighten someone’s birthday. With a little folding, cutting, and creativity, what begins as a simple piece of paper becomes a memorable surprise that unfolds with joy.
So if you’re looking for a thoughtful and fun way to celebrate someone’s special day, grab your scissors, pick your paper, and try making a pop-up card. It might just become your favorite new DIY tradition.

GIPHY App Key not set. Please check settings