

 Z
Z
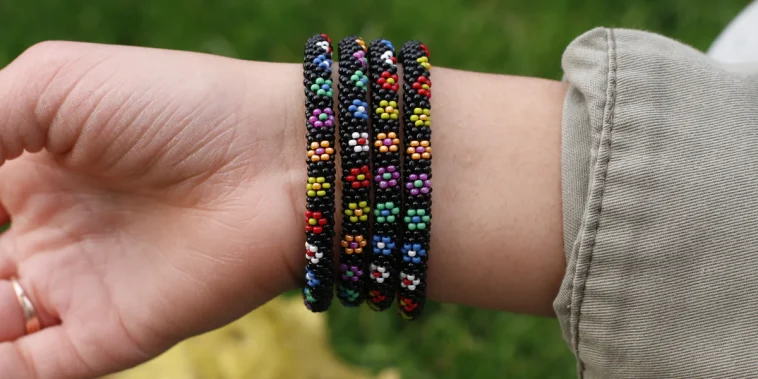
Making jewelry has always felt like one of the most personal forms of creativity. It’s wearable, customizable, and speaks volumes about your style. Among all jewelry crafts, beaded bracelets are some of the most approachable and rewarding to make. In this DIY beaded bracelets tutorial step by step, I’ll walk you through every part of the process, from picking materials to finishing touches.
Whether you’re making a bracelet for yourself, creating a matching set for friends, or planning gifts for a special event, beaded bracelets allow endless variations. With just a few tools and some patience, you can end up with a polished, professional-looking piece.
This guide is ideal for beginners, but even experienced crafters can pick up a few new tricks. I’ll also include tips on color matching, pattern ideas, and how to secure your bracelets properly. Once you get the hang of it, you’ll see how easy it is to make high-quality accessories at home.
Materials You’ll Need
Before diving into the steps, gathering the right materials can make the entire project smoother. You don’t need anything fancy or expensive to get started.
Here’s my go-to list for this DIY beaded bracelets tutorial step by step:
- Beads of your choice , glass, wood, gemstone, acrylic, or seed beads
- Beading wire or elastic cord depending on the style
- Crimp beads or knot covers
- Clasp (lobster or toggle) and jump rings for non-elastic bracelets
- Scissors or wire cutters
- Crimping tool or pliers
- Bead stoppers or tape to hold beads in place during assembly
- Measuring tape or ruler
You can find these supplies at most craft stores or online. Once you’ve gathered everything, the fun part begins.
Step 1: Measuring Your Wrist
Start by figuring out the ideal bracelet length. I use a soft measuring tape to wrap around the wrist that will wear the bracelet. Then I add about one inch for comfort, especially if the bracelet includes bulky beads. If you’re using elastic cord, you can get away with less extra length.
For example, if the wrist measures 6 inches, aim for a bracelet that is about 7 inches long. Always double-check this measurement before you begin stringing beads.
Step 2: Preparing the Cord or Wire
Depending on the bracelet’s design, I either use elastic cord or beading wire. For stretchy bracelets, elastic cord is perfect. For more structured, clasped bracelets, I go with beading wire.
Cut the cord about 4 to 5 inches longer than the measured length. That extra bit gives you room for tying knots or attaching a clasp without struggling. If you’re working with beads that have small holes, make sure the cord or wire fits through easily.
Use a bead stopper or a small piece of tape on one end of the cord so beads don’t fall off while you work.
Step 3: Designing the Pattern
This part of the process is where creativity shines. Lay out the beads in the pattern you want before stringing. I usually use a bead board or just a clean tray to arrange my ideas. You can go for symmetry, alternating colors, or a gradient style.
For this DIY beaded bracelets tutorial step by step, I’ll demonstrate a simple repeating pattern:
- One focal bead (larger, decorative)
- Two spacer beads (small, metallic or neutral)
- Four colored accent beads
- Repeat
You can customize this however you like. The key is to pre-plan your layout before stringing so the final design looks balanced and intentional.
Step 4: Stringing the Beads
Once the design is set, start sliding the beads onto the cord or wire. I find that holding the cord taut between my fingers helps prevent beads from spilling off. Make sure to push each bead down so there are no gaps unless the design calls for spacing.
If you’re using beading wire, leave about two inches of slack at both ends to attach the clasp. If you’re using elastic cord, make sure not to stretch it while stringing, or the bracelet will end up too tight.
As the beads slide on, periodically double-check the length to match your original measurement.
Step 5: Securing the Ends
This part depends on the type of cord you chose.
For elastic bracelets:
Once all beads are on, tie a surgeon’s knot, a double knot followed by an extra loop through the last wrap. Pull it tightly and add a small dot of jewelry glue for extra hold. Let it dry fully, then trim the ends. If possible, tuck the knot inside a larger bead to hide it.
For wire bracelets with clasps:
Slide a crimp bead onto the wire, then a jump ring or clasp. Loop the wire back through the crimp bead and a few nearby beads. Pull the loop snug but not tight, allowing slight movement. Use crimping pliers to flatten the crimp bead and secure the wire.
Repeat on the other end with the other half of the clasp. Trim any excess wire.
This finishing step makes all the difference between a piece that looks handmade and one that looks handcrafted.
Step 6: Inspecting and Adjusting
Now that the bracelet is assembled, put it on or try it on someone else. Make sure it fits comfortably, lies flat, and doesn’t have too much tension. For clasped versions, check that the clasp opens and closes easily. For elastic ones, the stretch should be firm but not tight.
If something feels off, too long, too loose, uneven, now’s the time to fix it. Don’t hesitate to snip and redo. The more bracelets you make, the more confident you’ll get with sizing and finishes.
Tips for Mixing Beads and Styles
To get creative with this DIY beaded bracelets tutorial step by step, I often mix different textures, shapes, and materials. Try pairing glass beads with metal accents or wooden beads with natural stones.
Here are a few combos that always work well:
- Boho style: wooden beads, brass spacers, and feather charms
- Minimalist: all black or white beads with a single gold bead
- Bright and bold: rainbow seed beads strung in tight patterns
- Romantic: pearl beads with rose-shaped spacers and ribbon ends
I also like experimenting with stacking bracelets. Making three or four coordinating pieces using variations of the same color palette creates a trendy layered look.
Common Mistakes and How to Avoid Them
Even with a clear DIY beaded bracelets tutorial step by step, a few mistakes can throw off your final design. Here are some I’ve learned to avoid:
- Overfilling the cord: If there’s no stretch or give, the bracelet may break
- Using the wrong string thickness: If beads are heavy, thin string may snap
- Knots slipping open: Always double knot and glue elastic cord ends
- Uneven bead sizes: They can cause bunching or make the bracelet twist
- Neglecting symmetry: When one side is heavier, it may shift while worn
Careful prep and a steady pace during assembly help prevent most issues. It’s always better to take a little extra time than to start over.
Turning Your Bracelets Into Gifts
Handmade beaded bracelets make amazing gifts. I love packaging mine in small organza bags, kraft paper boxes, or even hand-painted envelopes. Add a small tag with the recipient’s name or a short quote for an extra special touch.
If you’re gifting to a group, say, bridesmaids, classmates, or coworkers, consider making color-themed sets. Coordinating designs across multiple bracelets can really elevate the presentation.
Another idea is to create a bracelet-making kit as a gift. Include beads, elastic cord, and simple instructions so the recipient can make their own. It’s a fun, interactive surprise that encourages creativity.
Cleaning and Maintaining Your Bracelets
Although they’re sturdy, handmade bracelets need a little care. I usually advise people to avoid water, perfume, or lotion when wearing them. Beads can discolor or elastic can stretch out over time.
If a bracelet starts to sag or wear out, I simply restring it. One of the benefits of doing this yourself is that you can always repair or update pieces with ease. Sometimes I even take apart old bracelets and reuse the beads for a brand new design.
Expanding Your Skills
Once you’ve mastered this DIY beaded bracelets tutorial step by step, it’s easy to level up. Try these ideas:
- Add charms with jump rings to create a more personalized piece
- Weave multiple strands together for a layered effect
- Use wire wrapping techniques for a more complex look
- Incorporate alphabet beads for custom messages or names
- Add leather cord or braided string for mixed-media pieces
Experimentation is part of the fun. Every bracelet you make builds confidence and sparks new design ideas.
Final Thoughts
This DIY beaded bracelets tutorial step by step proves how accessible and enjoyable it is to make your own jewelry. From selecting your beads to seeing the final piece on your wrist, every part of the process is satisfying. You don’t need a studio or fancy tools, just a little patience and creativity.
Now that you know the basic techniques, you can build a collection of unique bracelets to match every outfit, season, or mood. The possibilities are endless, and each piece you make carries your personal touch.
So gather your supplies, set up your workspace, and start stringing. You’ll be amazed at what your hands can create.



GIPHY App Key not set. Please check settings