

 Z
Z
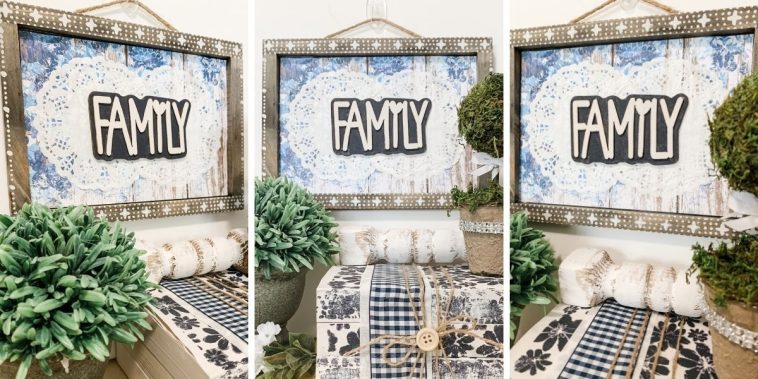
Decoupage is one of those timeless crafts that instantly transforms ordinary items into personalized treasures. Whether I’m working on a wooden box, a glass jar, a flowerpot, or even a piece of furniture, the process always feels magical. Paper becomes part of the surface, brushstrokes give it life, and the end result always surprises me with how beautiful it turns out. This beginner’s guide to decoupage is meant to take you through everything I’ve learned so you can dive into the art of paper layering with confidence.
Decoupage is simple at its core, but the creative potential is huge. It’s one of those crafts that can look both vintage and modern depending on your design choices. From home décor to handmade gifts, it fits just about any project style. I’ve used it to upcycle old items, add flair to dollar-store finds, and personalize gifts that felt far more special than anything store-bought.
What Is Decoupage?
Decoupage is the art of decorating a surface by gluing paper cutouts onto it and sealing the design with layers of finish. It originated centuries ago and was especially popular in Europe during the 17th century. Today, it’s a staple in the DIY world because it’s easy to learn, inexpensive, and yields impressive results.
In this beginner’s guide to decoupage, I’ll walk you through what you need, how to prepare your materials, and tips for getting the best results every time. You don’t need to be a professional artist or have a fancy craft studio. All it takes is patience, imagination, and the right supplies.
Supplies You’ll Need
The beauty of decoupage is that you only need a few basic materials. I always gather these essentials before I start:
- Decoupage glue or medium like Mod Podge
- Soft paintbrush or foam brush
- Scissors or craft knife
- Surface to decorate, wood, metal, glass, plastic, fabric, or even cardboard
- Decorative paper, napkins, tissue, magazine clippings, scrapbook paper, or printed designs
- Sandpaper (optional, for prepping)
- Acrylic paint for base color (optional)
- Clear acrylic sealer or varnish (optional)
You can find most of these items at a craft store or even a dollar store. I’ve also used leftover materials from other projects, making decoupage a great way to use what I already have on hand.
Preparing the Surface
Before I apply anything, I like to prepare my surface to ensure the paper adheres properly. If I’m working on raw wood, I give it a light sanding to smooth out any rough patches. For glass or plastic, I clean it thoroughly with rubbing alcohol or soapy water to remove any oils or dust.
If the base color of the item is too dark, I often apply a layer of white or light acrylic paint. This helps the paper design pop and avoids dull results. I always let the paint dry fully before moving to the next step.
Selecting the Right Paper
In my experience, the type of paper used plays a big role in how smooth and professional the final look appears. Thin paper like napkins, tissue, or rice paper works really well because it conforms easily to curves and edges. Scrapbook paper and magazine cutouts are a bit thicker and may require extra care to avoid bubbles or creases.
When I want intricate designs, I look for patterns that I can cut out precisely. For large backgrounds, I prefer lighter colors and soft textures so the brushstrokes don’t distract too much. If I’m printing designs at home, I use a laser printer to avoid ink smudging when I apply glue.
Cutting and Planning Your Design
Once I’ve chosen my paper, I cut out the elements I plan to use. I’ve learned not to rush this part. Clean, precise cuts make a big difference. If I’m working with napkins, I separate the top printed layer from the plain backing, only the top layer should be used in the project.
Before gluing anything, I lay out the cutouts on the surface to test different arrangements. This step helps me visualize the finished look and make changes without ruining anything. I often take a photo of the layout to use as a guide while gluing.
Applying the Paper
Now comes the fun part. I apply a thin layer of decoupage medium to the back of each paper piece or directly to the surface. Using a soft brush, I press the paper down gently, starting from the center and working out toward the edges. I smooth out any bubbles with my fingers or a plastic card.
Some papers wrinkle more than others, so I’ve learned not to overwork it. A few tiny wrinkles usually flatten out as the glue dries. If I’m working on a curved surface like a jar or a vase, I make small cuts along the edges of the paper so it curves more easily.
Sealing and Finishing
After I’ve glued all my pieces, I let everything dry completely. Then I brush a thin layer of decoupage medium over the entire surface to seal the design. I let that dry and repeat the process two or three more times for durability and a smooth finish.
If I want a glossy or matte effect, I finish the project with a clear sealer. This protects the paper and gives the whole piece a polished look. On high-use items like trays or furniture, I always use a waterproof sealant.
Tips for a Flawless Finish
Over time, I’ve picked up some tricks that make a big difference:
- Use thin coats of glue to prevent warping or bubbling.
- Let each layer dry completely before applying the next.
- Don’t rush the process, patience really pays off.
- Practice on small items before trying large or detailed pieces.
- Use tweezers for delicate designs to avoid tearing the paper.
These small habits have made every decoupage project feel more professional and less frustrating.
Project Ideas for Beginners
In this beginner’s guide to decoupage, I want to share a few favorite projects that are great starting points. These require minimal materials but still make wonderful gifts or home accents.
Decorated Flower Pots – Clay pots are perfect for adding floral prints, quotes, or vintage patterns. They make lovely additions to a windowsill or balcony.
Wooden Boxes – I’ve used cigar boxes, thrifted jewelry boxes, and even plain storage boxes to create keepsakes with personalized paper designs.
Glass Jars and Bottles – Old jam jars and wine bottles become candle holders or vases with a little paper and glue.
Coasters – I cut wood slices or thick cardboard and cover them with themed prints. After sealing, they’re practical and stylish.
Furniture Accents – For the brave beginner, drawers, tabletops, and cabinet doors offer larger canvases for bold designs.
Each of these projects is flexible and allows room to explore your own style. Whether rustic, modern, or whimsical, decoupage works with it all.
Common Mistakes to Avoid
In any beginner’s guide to decoupage, it’s important to talk about what not to do. I’ve learned many of these the hard way.
Skipping prep work – Surfaces that are dusty, oily, or too rough will cause the paper to peel or bubble.
Using too much glue – Excess glue makes the paper soggy and prone to tearing. Less is more.
Choosing the wrong paper – Thick or glossy paper is harder to work with. Start with thin napkins or tissue.
Not sealing properly – Without a good seal, the paper will fade, peel, or get damaged easily.
Rushing the drying time – I used to be impatient and ended up with smudges or streaks. Now I let each coat dry overnight for the best results.
Avoiding these mistakes has helped me finish each project with pride instead of disappointment.
Giving Decoupage Gifts
One of the reasons I love decoupage is how easily it becomes a personalized gift. Whether I’m making a photo-covered frame for a friend or a recipe box with vintage kitchen prints, I always find joy in the process.
A handmade decoupage piece tells the recipient that I took time to create something meaningful. With just a few hours of work, I can turn basic materials into something heartfelt and beautiful.
To package decoupage gifts, I often wrap them in kraft paper or linen bags and include a handwritten note explaining the inspiration behind the design. It makes the gift feel even more personal.
Expanding Your Skills
After getting comfortable with the basics, I started branching out. Here are a few ways I’ve taken my decoupage to the next level:
Layering designs – Adding depth with multiple layers of paper or images.
Combining with painting – Blending decoupage with hand-painted backgrounds or borders.
Using fabric – Applying lightweight fabric instead of paper for a textured effect.
Creating mixed media art – Combining decoupage with stamps, stencils, or embossing.
Each new technique adds something fresh and exciting. With every project, I discover new ways to express creativity.
Final Thoughts
This beginner’s guide to decoupage is just the beginning of what’s possible. With a little practice, anyone can transform plain items into stunning handmade pieces. The process is easy to learn, endlessly customizable, and incredibly rewarding.
Whether I’m decorating a simple box, personalizing a frame, or giving an old item a second life, decoupage never gets old. The satisfaction of watching a project come together with just paper and glue is something I always look forward to.
I encourage you to try your hand at this craft. Start small, be patient, and have fun. Every piece you make will be uniquely yours, full of character and charm. And who knows? You might fall in love with it the way I did.

GIPHY App Key not set. Please check settings