

 Z
Z
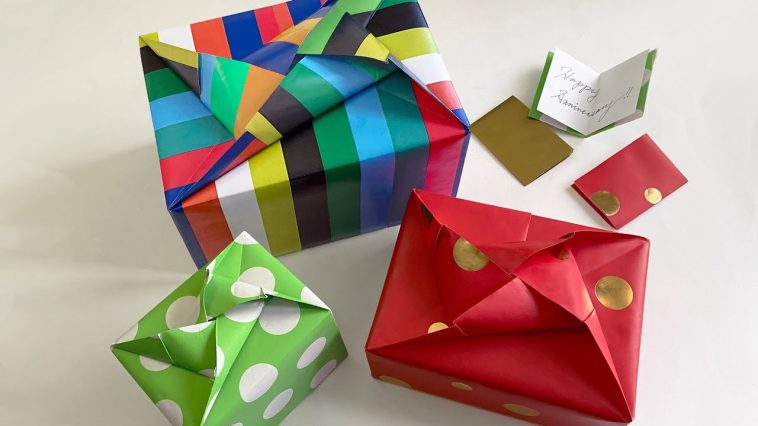
One of the most satisfying parts of giving a gift is watching someone light up before they even open the box. I’ve come to appreciate how powerful presentation can be, and nothing feels more personal than wrapping a gift with your own hands. Lately, I’ve been experimenting with DIY origami gift wraps and decorations. Not only is it a fun way to infuse creativity into gifting, but it also elevates the entire experience for the recipient.
With a few sheets of paper and a bit of patience, it’s possible to create stunning folded art that’s both decorative and functional. These wraps and embellishments don’t just add style, they send a clear message that you’ve put thought and care into the entire gift, from the inside out. In this guide, I’ll walk you through how I use origami for gift wrapping and decoration, including some of my favorite folds, materials, and tips for making it all come together beautifully.
Why Origami Works So Well for Gift Wrapping
One thing I love about origami is its versatility. You can create boxes, bows, envelopes, flowers, and more, all from a single sheet of paper. There’s no need for glue or scissors unless you want to take things further, and you can scale everything to suit the size of your gift. Whether you’re wrapping a bar of handmade soap or adorning a bottle of wine, origami can make it look like something from a boutique.
DIY origami gift wraps and decorations also offer a sustainable alternative to commercial wrapping paper. I often use recycled or specialty paper, which means I’m being kinder to the planet while still presenting something stylish and unique. It’s a win-win.
Materials I Keep on Hand
To create a collection of origami wraps and decor, I start by gathering a few basic supplies. Here’s what I usually have ready:
- Square origami paper in various colors and patterns
- Kraft paper or recycled sheets for a rustic feel
- Lightweight washi paper for elegance
- Bone folder or ruler for making crisp folds
- Twine, ribbon, or jute for tying pieces together
- Small embellishments like buttons, charms, or dried flowers
While traditional origami uses square sheets, gift wrapping often calls for a bit more flexibility. I cut my own squares from wrapping paper, old calendars, or magazine pages depending on the look I want.
Origami Gift Boxes
One of my favorite ways to use origami in gift wrapping is by folding gift boxes. These are perfect for jewelry, candies, or other small treasures. The most common type I use is the masu box. It’s a square container with straight sides and a snug-fitting lid.
To make one, I fold two identical sheets of paper into separate lids and bases. The precision of the fold is important, but the process is surprisingly simple once I’ve done it a few times. These boxes not only look beautiful, but they also store flat until I’m ready to use them.
For a more refined appearance, I use metallic origami paper or thicker scrapbook paper. Sometimes I add a band of ribbon or a small tag to the lid for a personal touch.
Paper Bows That Pop
Traditional store-bought bows are often bulky or wasteful. That’s why I’ve turned to origami bows to dress up my packages. These bows sit flat on the paper but still manage to stand out thanks to their clean folds and symmetry.
I love using bold, patterned paper to fold these. Once finished, I tape them to the top of wrapped gifts or glue them onto tags. Origami bows are especially helpful for mailing packages, since they add flair without bulk.
Envelope Folds for Notes and Cards
Gift giving often includes a heartfelt note, and origami envelopes make even a simple message feel special. I use medium-weight paper to fold small envelopes that can hold gift cards, cash, or handwritten letters.
One of my favorite folds is the traditional diamond-shaped envelope that closes with a tucked-in flap. Sometimes I fold it from transparent vellum so the contents peek through, or I use handmade paper with natural fibers for a rustic touch.
You can also make mini envelopes and attach them to wrapped gifts as tags. These can hold coupons, messages, or clues to a gift scavenger hunt.
Origami Flowers for Decoration
Few things add charm to a gift like a paper flower. I make origami lilies, cherry blossoms, and even roses to top off presents or string together as garlands. These flowers take a bit more practice, but the payoff is worth it.
What I enjoy most is that each flower becomes a keepsake. People often save them long after the gift has been opened. I sometimes place a tiny origami flower inside a gift box as a little surprise.
If I’m working with plain wrapping paper, a paper flower instantly brightens things up. I attach them with glue dots or twine and occasionally add a small paper leaf for detail.
Origami Stars and Hearts
For smaller gifts, I love folding tiny stars or hearts to sprinkle inside boxes or tie onto tags. They’re quick to make and look adorable. The puffy origami stars are especially fun because they pop into shape with just a few folds and a gentle squeeze.
I often make a batch of stars from pastel or metallic paper, drop them into a glass jar, and gift it as a “jar of good wishes.” Each star can have a note written inside before it’s folded, making it extra meaningful.
Creating Themes with Color and Pattern
When I work on DIY origami gift wraps and decorations, I usually decide on a color palette ahead of time. This gives all the elements a unified look. For winter holidays, I go for deep reds, silvers, and greens. In spring, I lean into florals, soft yellows, and blues.
Mixing solids with patterns keeps the look balanced. If the box is patterned, I use a solid bow. If the wrapping is plain, I might go bold with a floral envelope or geometric paper flower. The contrast helps each element stand out without looking cluttered.
Tips That Help Me Along the Way
After lots of trial and error, I’ve learned a few tips that make this process smoother:
- Start with basic folds: Simple boxes and bows are great for beginners and still look beautiful.
- Use clean, crisp paper: Soft or wrinkled paper can make folds imprecise. A bone folder helps keep things sharp.
- Practice before using your favorite paper: I use scrap paper to test folds before switching to expensive sheets.
- Pre-measure gift sizes: Knowing the dimensions of the gift helps me choose the right origami element.
- Mix origami with other materials: Adding twine, dried flowers, or handwritten tags enhances the handmade look.
Making It Interactive for the Recipient
One idea I’ve fallen in love with is making part of the wrapping reusable or interactive. Origami gift boxes and envelopes can be reused later to store trinkets. The decorations, like bows or flowers, can be detached and saved. I’ve even made paper ornaments that double as gift toppers.
This approach makes the wrapping part of the gift experience, rather than something that gets thrown away. It also encourages others to explore paper folding themselves.
Origami Wrapping for Bottles and Jars
Wrapping bottles is often a challenge, but origami has a solution for that too. I use large sheets to create pleated or fan-fold wraps, then tie them at the neck with ribbon. You can also fold paper into a bottle collar or decorative sleeve.
For mason jars, I fold circular paper caps and decorate them with paper butterflies or flowers. These are great for homemade jam, bath salts, or cookie mixes. The layered look is elegant and completely customizable.
Origami Garlands and Tags
When I have leftover paper from other projects, I fold small shapes and thread them into garlands. These can be used to wrap around boxes or drape across a gift bag. Hearts, cranes, stars, and diamonds all work well.
I also cut small gift tags and embellish them with origami miniatures. A tiny crane or heart glued to a tag immediately makes it feel more special. I keep a collection of these on hand to use during birthdays, holidays, or spontaneous gift moments.
Teaching Others and Crafting Together
One of the best parts of working on DIY origami gift wraps and decorations is that it’s easy to share. I’ve hosted small workshops with friends where we all fold elements together. It becomes a social experience where we learn from each other and walk away with a stack of finished bows or boxes.
I’ve also included paper folding as an activity during baby showers or birthdays. Guests create flowers or hearts that are later used to wrap group gifts. This adds a collaborative element to the gift and makes everyone feel involved.
Final Thoughts
What makes DIY origami gift wraps and decorations so special is their power to elevate even the simplest gift into something heartfelt and memorable. Every fold holds intention. Every crease adds a bit more beauty. Whether I’m making a quick paper bow or folding an intricate flower, the process itself becomes part of the gift.
I’ve found that people remember the wrapping just as much as the present inside. The effort shows, and it tells them they’re worth it. If you’re looking for a way to bring extra meaning to your gifts, I can’t recommend origami enough. It’s meditative, accessible, and endlessly creative, and the results speak for themselves.

GIPHY App Key not set. Please check settings