

 Z
Z
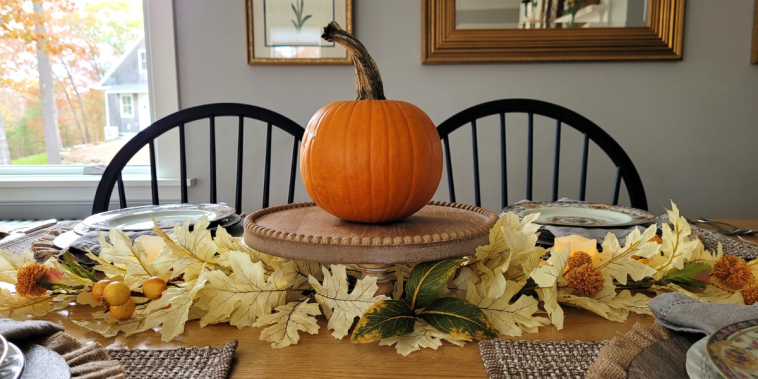
Thanksgiving is all about gathering with loved ones, sharing good food, and creating an atmosphere filled with warmth and gratitude. One of the simplest yet most beautiful ways to set the tone for your celebration is by adding a handcrafted centerpiece to your table. Figuring out how to make a Thanksgiving centerpiece doesn’t have to be complicated or expensive. In fact, using natural elements, items you already have, and a touch of creativity can result in something truly stunning.
Each year, I try to come up with a new style or theme for my Thanksgiving table, and the centerpiece always ends up being the heart of the setup. Whether you’re hosting a large dinner or just want to add a festive touch to a quiet meal, a handmade centerpiece adds personality and charm. I’ve pulled together ideas, tips, and step-by-step instructions that you can follow or customize to make something uniquely yours.
Gathering Inspiration and Supplies
Before starting any project, I like to step back and think about what kind of mood I want to set. Do I want the table to feel rustic and earthy, or more elegant and polished? This helps guide what I use , whether it’s pumpkins, candles, florals, or foliage. I always walk through my home first and take stock of what could be reused, like vases, baskets, bowls, or candle holders.
For most Thanksgiving centerpieces, I gather the following materials:
- Assorted gourds or small pumpkins
- Fresh or faux greenery and branches
- Candles of varying heights
- Floral foam or a low container
- Pinecones, acorns, or dried fruit
- Ribbon, twine, or burlap
- Scissors, wire cutters, and hot glue
Knowing how to make a Thanksgiving centerpiece starts with working with what you have and letting your own style shine through. Sometimes the simplest elements come together to create something truly striking.
Working with Natural Elements
Nature is always my favorite place to look for centerpiece materials. A quick walk outdoors can provide pinecones, branches, colorful leaves, and dried grasses. I love mixing textures , the smoothness of mini pumpkins with the roughness of bark or pinecones adds interest without feeling forced.
One arrangement I return to often starts with a wooden tray or box as the base. I fill it with moss, then nestle in small pumpkins, clusters of berries, and a few unscented candles. Twigs and dried eucalyptus are tucked in between, creating a balanced, organic look. If I’m going for something more earthy, I’ll skip anything too colorful and stick with neutrals like ivory, gold, and sage green.
Pumpkin Vase Centerpiece
This idea is always a hit and makes for a great conversation piece. I pick a medium-sized pumpkin, cut the top off, and scoop out the insides. Then I insert a plastic or glass container filled with water inside and arrange fresh flowers like mums, sunflowers, and fall leaves. It turns into a gorgeous seasonal vase that looks professionally done but only takes about 30 minutes.
I usually spray the inside of the pumpkin with a bit of diluted bleach water to prevent mold, especially if I want it to last more than a couple of days. Faux pumpkins work well for this too and can be reused year after year. Whether using fresh or faux, this method is a great example of how to make a Thanksgiving centerpiece that really stands out.
Candlelit Elegance
Candles add that magical glow that instantly warms a space. I like to group them in threes or fives, using a mix of heights for visual interest. Tall tapers, short pillars, and tea lights create depth and dimension. To make the candles feel festive, I wrap their bases in small grapevine wreaths or tuck them into glass hurricanes filled with acorns or corn kernels.
Surrounding the candles with seasonal touches like dried orange slices, cinnamon sticks, and cranberries adds color and fragrance. I always make sure to keep any flammable decorations a safe distance from open flames, or opt for flameless candles when needed. The soft lighting adds so much ambiance and makes dinner feel extra special.
Rustic Farmhouse Basket Arrangement
One centerpiece I made that really impressed guests used a long woven basket as the base. I filled it with dried wheat bundles, mini pumpkins, faux apples, and a few sprigs of lavender for contrast. I layered in folded pieces of plaid fabric and added some battery-operated fairy lights for a soft twinkle.
The basket was narrow enough not to crowd the table, and because it was low, everyone could see across the table without having to lean around it. This approach is great if you want to learn how to make a Thanksgiving centerpiece that’s both beautiful and practical.
Woodland-Inspired Centerpiece
If you want a theme that brings the outdoors in, a woodland arrangement is a lovely option. I start with a base of birch logs or wood slices. Then I add moss, pine branches, antlers, and mushrooms made from felt or wood. Scattering some white pumpkins or dried lotus pods adds texture and makes it feel more refined.
This kind of centerpiece works well for both indoor and outdoor settings. The natural elements tie together nicely and evoke that cozy, cabin-in-the-woods feeling that works so well for Thanksgiving.
Simple Mason Jar Arrangements
Mason jars are incredibly versatile and can be dressed up in so many ways. I often fill them with seasonal flowers, wrap a bit of burlap around the middle, and secure it with twine. I group three or four jars together on a wood slab or metal tray, surround them with leaves, and add a candle or two.
This setup works especially well if you’re pressed for time or decorating on a budget. You can use jars of different shapes and sizes for variety and include everything from fresh herbs to faux berries.
Using Fruits and Vegetables
I love incorporating seasonal produce into my centerpiece designs. Pears, apples, squash, and pomegranates add color and texture. I often polish them up and place them in a wooden bowl lined with greenery. For a more styled look, I’ll arrange them in a zigzag pattern along a runner, nestling in small florals or herbs like sage and rosemary between them.
This edible approach is great because it minimizes waste and feels natural on a food-focused holiday. Knowing how to make a Thanksgiving centerpiece that doubles as a display of abundance is always a win.
Incorporating Personalized Touches
Adding names, messages, or family traditions into the centerpiece makes it feel more special. One year, I wrote down reasons I was thankful for each person and placed the notes inside tiny pumpkins at each place setting, all centered around a display of candles and florals.
Another time, I used photo clips to display small snapshots of past Thanksgivings and tucked them into a centerpiece made of wheat and feathers. These personal touches often get the biggest reactions, and they remind everyone why they’re gathered together in the first place.
Working with Color Themes
While traditional Thanksgiving colors like orange, brown, and gold always work well, I’ve found that experimenting with unexpected color palettes can be refreshing. Deep burgundy and blush, navy and copper, or all-neutral whites and creams can give your table a modern edge.
When I stick to a color palette, I make sure to echo the shades in the napkins, plates, or even glassware. It brings the whole table together and makes the centerpiece feel intentional and elegant.
Last-Minute Centerpiece Ideas
For those moments when guests are arriving and the table still looks bare, I’ve found that gathering a few candles, fall leaves, and a bowl of fruit can go a long way. Even a single vase filled with branches can create a clean and modern look. I’ve also used items like stacked books wrapped in ribbon or a simple arrangement of wheat in a glass jug when I’m short on time.
How to make a Thanksgiving centerpiece doesn’t always mean spending hours preparing. Sometimes, quick and clever combinations can be just as impactful.
Display Tips and Finishing Touches
No matter the design, I always keep these tips in mind:
- Keep the centerpiece low enough that guests can see each other
- Add depth with layers, heights, and textures
- Use unscented candles so they don’t compete with the food
- Anchor the design with a base like a tray, runner, or tablecloth
- Add name cards or place markers that match the centerpiece
Finishing details like scattered leaves, cloth napkins tied with twine, or metallic accents bring everything together. I try to look at the table from every seat and make sure the centerpiece looks good from all angles.
Creating a Tradition
Over time, making a Thanksgiving centerpiece has become a tradition in my home. It signals the start of the holiday season and gives me time to reflect on what I’m grateful for. Sometimes I make it alone, sometimes with my kids, and other times as part of a larger decorating day with friends or family.
No matter how elaborate or simple the final result, the act of creating something with care always adds meaning to the holiday. Figuring out how to make a Thanksgiving centerpiece becomes less about following a set formula and more about expressing what the season means to you.
Final Thoughts on Bringing It All Together
Decorating your table is a chance to tell a story, and learning how to make a Thanksgiving centerpiece gives you the opportunity to say something personal. It’s not just a decoration, it’s the visual heart of the table , something that brings people together and makes them feel welcome.
With the right mix of natural elements, personal touches, and a little imagination, you can create a centerpiece that adds warmth and beauty to your celebration. Whether you go rustic, elegant, playful, or heartfelt, your handmade centerpiece will become part of the memories made around the table.



GIPHY App Key not set. Please check settings