

 Z
Z
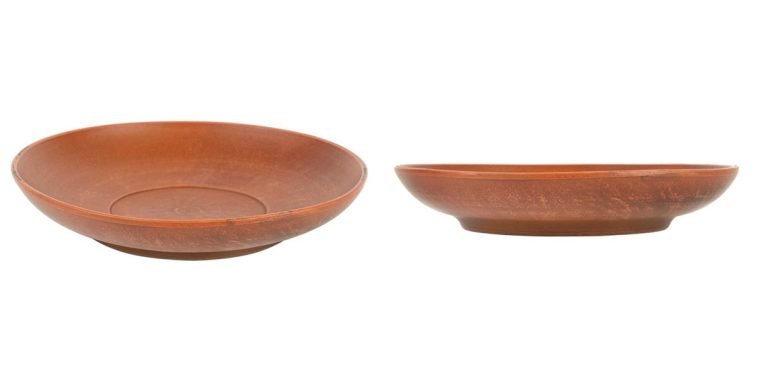
Creating beautiful handmade pieces doesn’t have to be complicated or expensive. One of my favorite beginner-friendly projects is making trinket dishes out of clay. These little dishes are perfect for holding rings, earrings, coins, keys, or even just acting as decorative accents on shelves and vanities. In this DIY clay trinket dish tutorial, I’ll walk you through everything step by step so you can make your own stunning clay dishes right at home.
This is a project that blends practicality with creativity. The process is simple enough for beginners but leaves plenty of room for personal flair. Whether I want to make a batch of dishes for gifts or just want to add some handmade charm to my dresser, I always enjoy how customizable and satisfying this project can be.
Materials and Tools Needed
Before diving into the process, it’s essential to gather all the materials and tools. This ensures the entire process is smooth and lets me focus on the creative part.
Here’s what I typically use:
- Polymer clay or air-dry clay in colors of choice
- Rolling pin or a smooth glass bottle
- Craft knife or clay cutter
- Small bowl or circular object to trace
- Parchment paper or a non-stick work surface
- Acrylic paints and brushes for decorating
- Gold leaf or metallic paint for accents
- Clear gloss glaze or sealer
- Sandpaper or nail buffer
- Oven (for polymer clay) or a dry area (for air-dry clay)
Polymer clay is a personal favorite because it bakes solid and lasts a long time. Air-dry clay also works well, especially if I’m making dishes with a more matte, rustic finish.
Setting Up the Workspace
I like to start by preparing a clean, flat surface to work on. Rolling out clay can be messy, and it’s important to avoid dust or debris sticking to it. I usually lay down a piece of parchment paper or use a silicone mat.
Then I get my tools laid out and condition the clay by kneading it in my hands. This helps warm it up and makes it more pliable. If the clay feels too hard or crumbly, I add a few drops of water or use a clay softener to bring it to life.
Rolling Out the Clay
For the base of the trinket dish, I roll out the clay until it’s about a quarter-inch thick. I try to keep it even throughout so the finished dish won’t be lopsided. Using a rolling pin or even a smooth drinking glass works well here.
Once I’m happy with the thickness, I cut out a circular shape using a small bowl or lid as a guide. I press it into the clay, twist gently, and lift away the excess. This leaves me with a clean, perfect circle that will form the base of my dish.
If I want a different shape, like a heart, star, or square, I use cookie cutters or freehand with a craft knife. Just about any shape works as long as the edges are smooth.
Shaping the Dish
To give the clay circle a dish shape, I transfer it into a shallow bowl or onto a rounded mold. I gently press the clay down into the bowl so it takes on the curve. If I’m using air-dry clay, I make sure to press it softly to avoid cracks.
If I want a more freeform look, I curve the edges slightly upward with my fingers, pinching and lifting sections. This gives the trinket dish a more organic, handmade vibe.
For polymer clay, once I’m happy with the shape, I leave it in the bowl and place the whole thing in the oven to bake according to the clay’s instructions, usually around 15–30 minutes at 275°F. For air-dry clay, I let the dish sit in a warm, dry place for 24 to 48 hours, checking occasionally for any warping or cracking.
Sanding and Smoothing
After the clay dish is fully dry or baked and cooled, I smooth the edges with fine-grit sandpaper or a nail buffer. This step makes a big difference in the final appearance. Rough or uneven edges can make the dish look unfinished, but just a few minutes of sanding brings it all together.
If I’m using air-dry clay and notice any cracks or imperfections, I lightly mist the surface and patch it with a bit of fresh clay, then sand again once it’s dry.
Painting and Decorating
Now comes the part where the dish really starts to shine, decoration. I often use acrylic paints to add color, patterns, or details. Metallic paint, especially gold or copper, adds a beautiful accent to the rims or designs.
One of my favorite techniques in this DIY clay trinket dish tutorial is marbling. To get a marbled look, I twist together two or more colors of clay before rolling them out. The result is a swirled, stone-like pattern that looks elegant and modern.
For painted designs, I use fine brushes to add florals, polka dots, stripes, or abstract shapes. Even simple color blocking can look amazing. Sometimes I use rubber stamps to press textures or patterns into the clay before baking.
If I’m feeling fancy, I add gold leaf flakes to the rim or the surface, pressing them gently into the clay or using adhesive for a controlled design. This gives the trinket dish a luxurious finish.
Sealing the Dish
After the paint is completely dry, I always seal the dish with a clear gloss glaze. This gives it a beautiful shine and protects the paint from wear. For dishes used with jewelry, especially metal pieces like rings or earrings, the glaze helps keep everything scratch-free.
I apply the sealer with a soft brush and let it cure fully before using or wrapping the dish. For extra protection, I sometimes do a second coat.
Gifting the Finished Dish
A finished trinket dish makes a lovely handmade gift. I often wrap mine in tissue paper and place it in a small box or fabric pouch. Adding a handwritten tag or a ribbon makes it feel extra special.
Whether I’m giving one as a birthday gift, a bridesmaid thank-you, or just a token of appreciation, these dishes always impress. They’re both useful and sentimental, and they show that time and care went into the gift.
Troubleshooting Common Problems
Working with clay can come with a few hiccups, especially early on. Here are some issues I’ve encountered while following this DIY clay trinket dish tutorial and how I’ve learned to fix them:
Cracks in air-dry clay – This usually happens if the clay dries too quickly. I try to dry my dishes in a cool, shaded spot and avoid placing them in direct sunlight or near heat sources.
Uneven shapes – If the dish warps or droops while baking or drying, I make sure the surface it’s drying on is level and that the clay is properly supported in a bowl mold.
Bubbling paint – Paint sometimes bubbles when applied too thickly. I now paint in thin layers and let each coat dry fully before adding another.
Sticky surface after sealing – A sticky glaze often means it hasn’t cured properly. I let my dishes sit in a ventilated area for at least 24 hours, or longer if the weather is humid.
Creative Variations to Try
After getting the basics down, I started experimenting with new ideas. This is where the fun really begins. The possibilities are endless, and here are a few directions I’ve taken this DIY clay trinket dish tutorial to make it my own:
Leaf impressions – I press real leaves into the clay before shaping to create natural textures. Once baked and painted, the leaf veins look beautiful.
Stamped words or initials – I use metal alphabet stamps to press messages into the clay, such as names, dates, or affirmations.
Geometric shapes – Triangles, hexagons, and diamonds make great alternatives to the traditional circle. These modern shapes look sleek and unique.
Tiered sets – I make sets of dishes in varying sizes that stack together. They’re great for organizing different jewelry pieces.
Themed designs – For holidays or events, I customize dishes with seasonal colors, patterns, or decals.
Why Handmade Dishes Are Always in Style
In a world of mass-produced goods, handmade items stand out. Every dish I make carries a bit of personality. It might have a slight asymmetry, a visible brushstroke, or an unexpected color blend, and that’s exactly what makes it special.
The dishes I’ve made using this DIY clay trinket dish tutorial are now scattered all over my home. One holds rings near the sink. Another sits by the entryway with keys. Others live on desks and shelves as little catch-alls for paperclips, earrings, or crystals.
They’re the kind of small item that brings joy in daily routines. Every time I set down my earrings or slip my ring into the dish, I’m reminded of the fun I had making it. And when I give one away, I know I’m giving a piece of myself too.
Final Thoughts
Learning how to make a clay trinket dish is a rewarding and enjoyable way to spend a weekend afternoon. Whether you follow a minimalist style or lean into bright colors and bold patterns, your finished dish will be a reflection of your creativity.
This DIY clay trinket dish tutorial gives you the foundation, but the true beauty lies in personal expression. Every twist of the clay, every brushstroke, every detail added by hand makes your dish unique. So grab your materials, clear a little space on the table, and start rolling. You’ll be surprised by how satisfying and addicting this craft can be.
If you’ve made your own version using this tutorial, I’d love to see your results. Share your designs or ask questions and let’s keep the creativity going.

GIPHY App Key not set. Please check settings