

 Z
Z
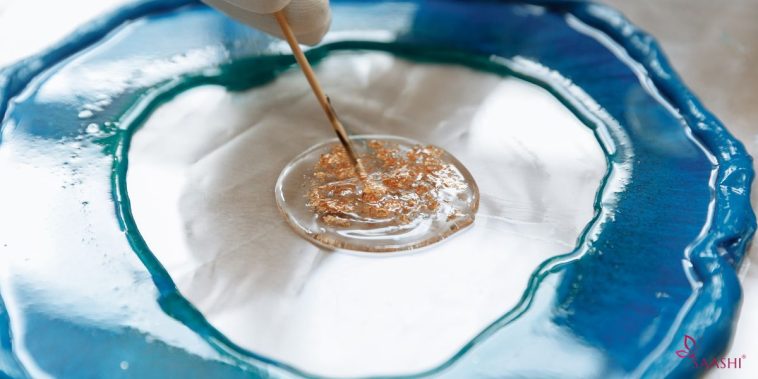
Making resin coasters with glitter has become one of my favorite weekend projects. It’s the perfect balance of creativity and functionality. I love watching the resin transform from a liquid pour into a shimmering, solid piece of art. These coasters make beautiful gifts, eye-catching additions to a coffee table, or even a fun way to start a small business.
If you’ve been wondering how to make resin coasters with glitter, you’re in the right place. This detailed guide will walk you through every step, from gathering materials to adding finishing touches. Whether you’re brand new to resin or simply looking to add sparkle to your next batch, this is your roadmap to success.
Materials You Will Need
Before starting, I always like to gather everything in one place. Here’s what I use for every glitter resin coaster I make:
- Epoxy resin and hardener (measured according to brand instructions)
- Silicone coaster molds
- Mixing cups and stirring sticks
- Measuring scale or cups
- Fine or chunky glitter
- Disposable gloves
- Mask or respirator
- Protective table covering
- Toothpicks or heat gun for bubbles
- Alcohol spray for finishing
- Optional: mica powders, dyes, dried flowers, foil flakes
You’ll want to work in a well-ventilated area and cover your work surface to avoid sticky messes. Resin can be toxic while in liquid form, so gloves and a mask are non-negotiables for me.
Choosing Glitter and Add-Ins
One of the most exciting parts of learning how to make resin coasters with glitter is selecting your materials. Glitter comes in so many forms: fine, chunky, holographic, metallic, and even biodegradable.
I like to experiment by combining different types for added texture and depth. Sometimes I mix in a hint of mica powder to give a pearlescent effect. Other times I sprinkle foil flakes to break up the sparkle with pops of gold or copper.
There’s no right or wrong combination. This part is all about letting your personal style shine. Just make sure whatever you use is safe for resin, some dyes and glitters can bleed or fade over time.
Preparing the Mold
Before mixing the resin, I prep my silicone molds. I inspect them to make sure they’re clean and free of dust. A quick wipe with rubbing alcohol and a lint-free cloth does the trick.
I like to place the mold on a level surface and tape down the corners of my plastic sheet or cardboard base. This helps keep everything in place once the resin is poured. I also prop up a bubble level nearby to double-check that my working surface is flat. Resin will settle unevenly if it isn’t.
Mixing the Resin
I follow the mixing instructions on the resin packaging carefully. Most epoxy resins require a 1:1 or 2:1 ratio of resin to hardener. I pour the components into a mixing cup, then stir slowly for 3 to 5 minutes. Stirring too quickly creates bubbles, so I make sure to scrape the sides and bottom of the cup gently as I go.
Once the resin is fully combined, I separate it into smaller cups if I’m using different glitter colors or additional design elements.
This is the moment where how to make resin coasters with glitter really starts coming together. The magic happens in the pour.
Adding Glitter to the Resin
There are two main ways I like to add glitter: either mix it directly into the resin or pour the resin first and sprinkle the glitter on top. For a more embedded look, I mix the glitter in thoroughly before pouring. For a layered or swirling effect, I pour a base layer, then add glitter halfway through the set time and swirl it with a toothpick.
I’ve found that less is often more with glitter. Using too much can affect the resin’s cure and result in a rough surface. A teaspoon per coaster usually does the job for me, depending on the type of glitter.
When I want multiple colors, I pour them in sections or swirls and gently blend the edges. This technique creates a marbled look and allows the different shades of glitter to reflect light uniquely.
Pouring into the Mold
I pour the resin slowly into the center of the mold, allowing it to spread naturally. If I’m working with a multi-color or multi-glitter design, I pour each color separately but close together. I then use a stick or toothpick to blend the borders slightly.
After pouring, I tap the mold gently to release air bubbles. A quick pass with a heat gun or a spritz of alcohol on the surface also helps eliminate any lingering bubbles. If a few persist, I nudge them to the edge using a toothpick.
Depending on the resin I’m using, I let it sit for 10 to 30 minutes before covering the mold with a dust-free container to keep out debris while it cures.
Curing and Demolding
Most resins take 24 to 48 hours to fully cure. During this time, I leave the mold undisturbed in a flat, level spot. I resist the temptation to touch it or peek under the cover because even a slight shift can cause surface imperfections.
When the resin is fully hardened, I carefully remove the coaster from the mold. I peel it slowly from one side to avoid stretching the silicone or damaging the edges of the piece.
There’s nothing like the satisfaction of seeing the finished shine of the cured resin. In this part of how to make resin coasters with glitter, it feels like all the effort is rewarded in one stunning reveal.
Smoothing the Edges
Sometimes the coasters have rough or uneven edges. I fix these with a bit of fine-grit sandpaper or a rotary tool on low speed. I sand gently in one direction until the edge feels smooth.
After sanding, I wipe down the coaster with a damp cloth or alcohol to remove dust. If I want an extra glossy finish, I brush a thin layer of resin around the sides or apply a clear coat spray sealer.
Customizing the Look
Resin is extremely versatile, and once you get comfortable with the process, there are so many ways to personalize your glitter coasters. Here are a few options I love experimenting with:
- Layering: Pour a thin base layer, let it set for a few hours, then add a second layer with glitter or a decal.
- Text or decals: Place vinyl cutouts or printed designs between layers to make personalized gifts.
- Pressed flowers or leaves: Add organic elements for a nature-inspired theme.
- Alcohol ink: Create flowing, dreamy patterns by dropping ink into the resin before it cures.
- Pigment powders: Mix with glitter or use on the surface for a dusted, shimmering effect.
These additions elevate each piece and turn it into something truly special.
Troubleshooting Tips
Resin work takes practice, and sometimes things don’t go exactly as planned. Here are a few common issues I’ve run into and how I solve them:
- Sticky or soft resin: Usually caused by incorrect mixing or measuring. I double-check the ratio and stir thoroughly.
- Too many bubbles: Stir slowly, use a heat gun, and work in a warm room to reduce trapped air.
- Uneven surface: Make sure the work surface is completely level before pouring.
- Dull finish: Polish with a soft cloth or apply another coat of resin or glaze to restore shine.
Even when something goes wrong, I try to view it as a learning opportunity. Every project teaches me something new about how to make resin coasters with glitter better the next time.
Gifting and Packaging
Glitter resin coasters make thoughtful and personalized gifts. I like to bundle them in sets of two or four and wrap them in tissue paper or place them in a kraft box tied with ribbon or twine. A small note or tag adds a lovely handmade touch.
For extra flair, I sometimes include a matching gift tag made from the same glitter or color palette. It ties the whole presentation together beautifully and shows the recipient how much thought went into their gift.
Selling Your Creations
Once I perfected my process, I began selling my resin coasters online and at local craft fairs. If you’re thinking about doing the same, here are some tips:
- Take clear, natural-light photos that show the sparkle and color accurately.
- Offer themed sets, like holiday colors, galaxy designs, or pastel florals.
- Include care instructions with every order.
- Price based on time, materials, and uniqueness, handmade glitter coasters have high perceived value.
- Be transparent about curing time if taking custom orders.
I found that many buyers are drawn to the uniqueness of handmade glitter resin coasters. They stand out and feel far more personal than mass-produced items.
Final Thoughts
Learning how to make resin coasters with glitter has added so much joy and sparkle to my creative world. The process is a beautiful mix of science and art, where precision meets freedom of expression. Whether I’m making them for myself, friends, or customers, each piece carries a sense of accomplishment and individuality.
If you’re new to resin, I encourage you to try your first batch with simple glitter designs. Once you see that crystal-clear shine mixed with vibrant shimmer, you’ll be hooked, just like I was. With time and experimentation, your own signature style will shine through every pour.
Resin may start as a sticky liquid in a cup, but in your hands, it becomes something magical. All it takes is patience, imagination, and a bit of glitter.


GIPHY App Key not set. Please check settings