

 Z
Z
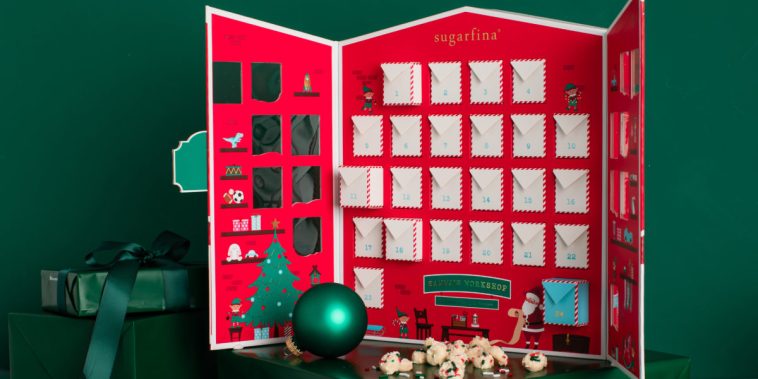
Advent calendars have always been one of my favorite ways to build anticipation for the holiday season. Each tiny surprise, sweet treat, or thoughtful note tucked behind a little door or inside a pocket carries the magic of Christmas in miniature. Learning how to make a handmade advent calendar has become a meaningful tradition that I revisit every year. It’s a creative and heartfelt way to count down the days to Christmas and adds a personal touch that store-bought versions just can’t match.
Whether I’m making one for kids, a partner, a friend, or even myself, I love designing calendars that reflect the personality and joy of the recipient. The best part is how flexible these projects can be. Some years I go rustic and natural, other years I lean into glitter and bright colors. Either way, I end up with something that’s festive, fun, and made with love.
Planning the Layout and Theme
Before jumping into the materials, I like to decide on a theme and layout. This helps guide the rest of the creative process. For some advent calendars, I use a wall-hanging format. Others are more like tabletop displays or even stand-alone boxes. Once I’ve chosen the style, I pick a theme , maybe a winter woodland, a Scandinavian color palette, or a classic red-and-green Christmas look.
I jot down ideas for each day’s surprise so I can plan the container size accordingly. That’s especially important if I want to include small toys, treats, or handwritten notes. When I’m figuring out how to make a handmade advent calendar, this stage saves time and helps me stay organized.
Materials to Gather
Depending on the style I’m making, the materials vary a bit, but here’s a list of items I usually keep nearby:
- Cardstock, wrapping paper, or scrapbook paper
- Scissors and craft knives
- Ruler and pencil
- Glue sticks, hot glue gun, or double-sided tape
- Number stickers or stamps
- String, twine, or ribbon
- Mini clothespins or binder clips
- Small containers like boxes, envelopes, or fabric pouches
- Wooden board, frame, or canvas if I want to mount the calendar
The beauty of this project is how many materials can be upcycled or found around the house. I’ve used everything from leftover paper cups to baby socks to create advent calendars with charm and character.
Envelope Wall Calendar
One of the simplest and most visually appealing formats I’ve made involves attaching numbered envelopes to a board or piece of twine. I decorate each envelope with washi tape, stamps, or stickers and number them from 1 to 24. Each envelope holds a note, a challenge, a recipe card, or a small candy.
I arrange the envelopes in rows and attach them to a board with clothespins or tack them onto twine with clips. The result is lightweight, easy to hang, and easy to personalize. This style works beautifully when space is limited or when I want something flat and easy to store after the holidays.
Mini Gift Box Tree
A more three-dimensional option involves wrapping 24 tiny boxes in festive paper and stacking them in the shape of a Christmas tree. Each box is numbered and tied with ribbon. I arrange the boxes from largest to smallest, using double-sided tape to hold them in place if needed. You can build the tree on a table or inside a shadow box frame for extra impact.
This method is ideal for advent calendars that contain small trinkets or gifts. One year, I filled each box with a pair of earrings, small craft supplies, and inspirational quotes for a friend who needed a little extra joy during the season. The tree shape adds a classic holiday feel, and the excitement builds as more boxes are opened.
Hanging Advent Garland
If I want to add festive flair to a mantel or windowsill, I string together small pouches, bags, or boxes on a long piece of ribbon or twine. I hang them like a garland and secure each one with clothespins. This version allows for flexibility with size and spacing and becomes a charming holiday decoration all on its own.
I’ve made this using mini paper bags decorated with snowflakes, metallic tags, or burlap accents. For each day, I include a different surprise, such as a recipe, a candy cane, a mini ornament, or a holiday riddle. The mix of shapes and sizes keeps things visually interesting and playful.
DIY Advent Village
For a more elaborate and whimsical take, I sometimes create a miniature village using small cardboard houses. I cut and fold each one from cardstock or use pre-cut kits. Each house is decorated with glitter, faux snow, and tiny wreaths, and a number is added to the front. I arrange them on a shelf or tabletop with fairy lights running underneath.
Inside each house is a rolled note or treat. This advent calendar takes a bit more time to assemble, but it creates a magical scene that feels like a storybook village. It’s perfect for children or anyone who loves detailed decorations. This style shows just how fun and imaginative learning how to make a handmade advent calendar can be.
Pocket Calendar on Fabric
I love sewing, and one of my most durable advent calendars was made with a large piece of canvas or felt and 24 stitched pockets. I used colorful fabric scraps for each pocket, sewing them in rows onto a base panel. I numbered each pocket with iron-on numbers or fabric paint and added a loop at the top to hang it on the wall.
Each pocket is just big enough to hold a wrapped chocolate, a small toy, or a paper with a holiday activity. Over the years, I’ve reused this calendar by changing what I tuck inside. It’s a great long-term option and becomes part of the holiday decorations every December.
Fillers That Make Each Day Special
Once the calendar structure is done, the fun part is deciding what to place inside each section. Depending on the recipient and theme, I mix up what I include. Some of my favorite filler ideas are:
- Small candies or chocolates
- Holiday jokes or riddles
- Bible verses or inspirational quotes
- Mini puzzles or craft supplies
- Coupons for a movie night, hot cocoa, or a homemade dinner
- Ornaments or decoration pieces
- Acts of kindness or service suggestions
- Clues for a larger Christmas treasure hunt
Mixing meaningful moments with treats makes the calendar feel balanced and full of love. Even a simple note saying “You are loved” can be the most important surprise of the day.
Personalizing the Design
Adding a handmade touch means thinking beyond just the construction. I like to incorporate the recipient’s favorite colors, holiday symbols, or interests. For example, one year I made an advent calendar for a book lover with daily literary quotes and bookmarks. For kids, I’ve included stickers, crayons, or Christmas-themed toys.
The numbers can also become part of the decoration. I’ve used wooden tags, stamped circles, embroidered patches, and even puzzle pieces to mark each day. Adding textures, embellishments, and creative details transforms the project from a countdown tool into a piece of art.
Making the Calendar Reusable
While I love the charm of paper-based versions, I’ve also made calendars designed to last for years. Using fabric, wood, or sturdy boxes means I can refill the calendar each December with new surprises. I store reusable calendars in a labeled holiday box and take joy in bringing them out each season.
I’ve found that calendars with pouches, drawers, or hanging pockets work best for reusability. These styles allow me to rotate contents and change up the presentation without needing to remake the entire project every year.
Creating One with Kids
Advent calendars make wonderful collaborative projects with children. They can help decorate each pouch or envelope, brainstorm what to include, and even assist in setting up the layout. When my kids get involved, I let them create hand-drawn numbers, apply stickers, or tie bows. It’s a fun bonding experience and teaches them about anticipation, creativity, and giving.
Even toddlers can participate by stamping numbers or sticking felt pieces. Older kids love planning the contents and sometimes even help design a surprise calendar for a sibling or grandparent.
Displaying Your Advent Calendar
Presentation is part of the joy, so I always think about where to display the finished calendar. I’ve hung them on the wall, strung them across a fireplace mantel, arranged them along a staircase, or set them up on a sideboard with garlands and lights. Wherever it ends up, the calendar becomes a focal point of the holiday decor and a reminder of the countdown.
I sometimes add fairy lights, pine branches, or candles around the display to enhance the atmosphere. Creating a cozy nook around the calendar encourages everyone to pause and open each day’s surprise together.
The Magic Behind the Countdown
Advent calendars are more than just a countdown. They create tiny moments of joy every day in a season that often flies by too fast. Learning how to make a handmade advent calendar has taught me to slow down and savor the small things , a smile from a surprise note, the warmth of a shared treat, or the sparkle in someone’s eyes as they uncover the next day’s treasure.
Each year, the calendar becomes part of our rhythm and adds to the traditions we hold dear. It isn’t just about December anymore. It’s about remembering to give love and care in the smallest of packages.
Final Thoughts
When I set out to learn how to make a handmade advent calendar, I wasn’t expecting it to become such a beloved tradition. Now, each holiday season begins with the joy of crafting, planning, and watching others light up with each day’s surprise. Whether your calendar is made of paper, fabric, or wood, the love behind it is what truly matters.
Handmade advent calendars carry more than chocolate or notes , they hold intention. They show the recipient that each day leading up to Christmas is worth celebrating. And with just a little time, creativity, and care, you can turn simple materials into something magical.


GIPHY App Key not set. Please check settings