

 Z
Z
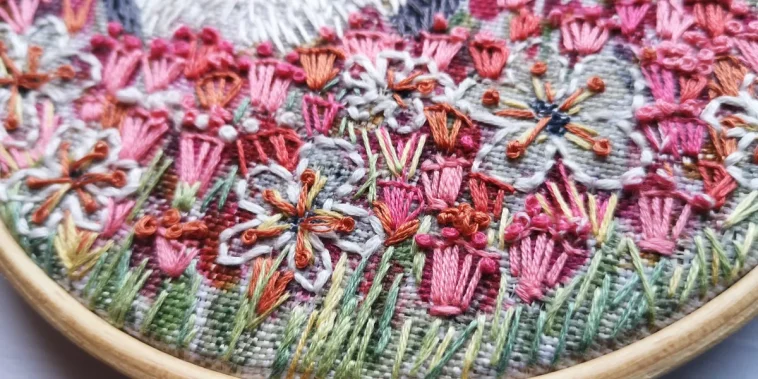
Embroidery has become one of my favorite ways to add a personal touch to handmade gifts. Whether it’s a name stitched into a baby blanket, a floral border on a handkerchief, or a sweet phrase on a tote bag, these tiny threads of detail can turn something ordinary into something meaningful. When I started working on gift projects, I found it helpful to master just a few essential techniques. You don’t need to be a professional to create something beautiful. In fact, learning basic embroidery stitches for gift projects is easy once you get the hang of it.
In this guide, I’ll share the stitches I use most often, how to work them step by step, and ways you can include them in your handmade presents. With just a few simple moves, you can turn fabric, thread, and creativity into gifts your loved ones will always remember.
Getting Set Up for Embroidery Success
Before diving into the stitches, I always set myself up with the right tools. A good start makes the whole process smoother and more enjoyable.
Here’s what I keep in my embroidery kit:
- Embroidery hoop, typically wooden and 6 to 8 inches
- Embroidery floss in various colors
- Needles with larger eyes made for embroidery thread
- Sharp scissors
- Fabric pencil or erasable marker
- Cotton or linen fabric
- Pattern or freehand design idea
Stretching the fabric tightly in the hoop is key. I place the fabric over the smaller ring, press the larger ring over it, and tighten the screw. The fabric should feel like the surface of a drum. This gives me a flat surface to work on and helps prevent puckering as I stitch.
Now that the setup is ready, I can move on to learning the most versatile basic embroidery stitches for gift projects.
Running Stitch
The running stitch is the most straightforward embroidery technique I’ve ever used, and it’s perfect for creating outlines, borders, or dashed lines.
To work a running stitch, I push the needle up from the back of the fabric, pull the thread through, and go down again about a quarter inch ahead. Then I bring the needle back up the same distance forward and repeat. This creates a dotted line effect that’s clean and charming.
I often use this stitch for tracing the outline of hearts, stars, or initials. It’s subtle yet adds a soft handmade vibe that’s great for minimalist designs or smaller details.
Backstitch
When I want to create a continuous, solid line, I use the backstitch. It’s strong, neat, and easy to control, making it ideal for lettering and precise outlines.
To do this stitch, I bring the needle up through the fabric, then move forward and push it down. Next, I bring the needle up again a short distance ahead, then go back into the end of the previous stitch. This creates a tight, smooth line that looks almost like it was drawn with a pen.
Backstitch is my go-to when I personalize hand towels with names or add messages to bookmarks. It holds up well through use and washing, which makes it perfect for practical gifts.
Satin Stitch
The satin stitch is a beautiful way to fill shapes with solid color. It adds depth and texture, and when done carefully, it creates a smooth, satin-like surface.
To work this stitch, I outline the shape with short straight stitches. Then I begin filling it in with tightly packed parallel lines, going from one side of the shape to the other. Each stitch should lie right next to the last, covering the fabric completely.
I love using satin stitch to embroider petals, leaves, or polka dots. It’s also lovely for monogrammed letters. While it takes a little more time, the result is polished and professional looking, ideal for gift items meant to impress.
French Knots
Whenever I want to add texture or a bit of whimsy, I use French knots. These tiny thread clusters look like beads and are excellent for flower centers, dotted patterns, or small decorative accents.
I bring the needle up through the fabric, wrap the thread around the needle twice, then press the needle down very close to the exit point while holding the thread taut. Pulling the needle through creates a tiny raised knot.
They can be a little tricky at first, but with a little practice, I can make dozens in a row. They add so much charm to tea towels, ornaments, and baby bibs. Just a sprinkle of them can elevate a simple design.
Chain Stitch
The chain stitch creates loops that look like links in a chain. It’s a decorative stitch that adds flair to borders, vines, or text.
I begin by pulling the needle up and making a small loop with the thread. Then I insert the needle back down at the same spot and bring it up a short distance ahead, catching the loop on the way up. I keep repeating this motion, making a row of connected loops.
Chain stitch works especially well for floral stems or decorative outlines. On pillowcases or gift bags, this stitch always brings an elegant, flowing feel.
Lazy Daisy
This stitch is a variation of the chain stitch and is perfect for flower petals. I often use it to create floral designs on linen napkins or canvas totes.
To make a lazy daisy, I bring the needle up and form a loop like a chain stitch. Then I secure it with a tiny stitch at the tip of the loop. I repeat this around a center point to form a flower.
Lazy daisies are sweet and versatile. I like to mix them with French knots and backstitches to build full garden-inspired motifs. The result feels joyful and inviting, just right for gifts that celebrate spring or special occasions.
Blanket Stitch
Blanket stitch is used to edge fabric and felt, creating a decorative and functional finish. It’s ideal for handmade items like bookmarks, coasters, or soft toys.
I start at the corner of the fabric, bringing the needle up, then inserting it forward and looping the thread under the needle as I pull through. This creates a looped line along the edge.
I often use this stitch to finish the edges of felt gift tags or ornaments. It gives them structure while adding a beautiful detail that makes them look professionally done.
Combining Stitches for Creative Projects
Learning basic embroidery stitches for gift projects opened up so many creative possibilities for me. I now mix and match stitches depending on the style and message I want to create.
For a floral handkerchief, I might outline stems with backstitch, fill the leaves with satin stitch, and use lazy daisies and French knots for the blossoms. On a tote bag, I might stitch someone’s initials in chain stitch and add a border of running stitches or a row of hearts.
Each stitch brings a different feeling. Backstitch is strong and reliable. French knots are playful. Satin stitch feels smooth and refined. When I combine them, the final piece feels layered and dynamic.
Tips to Keep Your Embroidery Neat
Over time, I’ve picked up some habits that keep my embroidery looking clean and crisp.
- I use shorter lengths of thread to avoid tangling or fraying.
- I take breaks to stretch and reset my posture to avoid hand fatigue.
- I trim the back threads neatly and use a dab of clear fabric glue to secure them when needed.
- I iron the fabric after finishing, placing a clean cloth on top to protect the stitches.
Slowing down and focusing on each movement helps me enjoy the process more. Embroidery is as much about the rhythm as the result.
Gift Ideas That Use Embroidery
Once you know how to use basic embroidery stitches for gift projects, the kinds of gifts you can make are endless. I’ve made embroidered bookmarks, hoop wall art, onesies, aprons, and even kitchen towels. They’re always a hit, and the handmade touch makes them feel thoughtful and original.
Monogrammed towels – I stitch a single letter in chain or satin stitch, with a floral border or starburst accents.
Embroidered napkins – A set of linen napkins with stitched corners or themed motifs like leaves, fruits, or holiday designs.
Personalized tote bags – Simple canvas totes embroidered with a name, phrase, or custom art. Great for teachers, bridesmaids, or book lovers.
Wall hangings – I stretch finished designs in hoops, then add a loop for hanging. These make lovely nursery décor or inspirational gifts.
Felt ornaments or tags – Using blanket stitch around the edges and simple motifs in the center, these are perfect for holidays or birthdays.
Even small stitched embellishments on cards or bookmarks can make a big difference. People always notice and appreciate the effort behind a handmade piece.
Final Thoughts
Learning basic embroidery stitches for gift projects has added so much joy to my creative life. Every time I pick up a needle and thread, I feel connected to something peaceful and meaningful. These stitches are more than decoration, they’re a way to show care, express creativity, and make something lasting.
Whether you’re making your first backstitch or mastering a bouquet of lazy daisies, embroidery offers a world of possibility. You don’t need fancy equipment or decades of practice, just the willingness to try and the patience to keep stitching.
Start with one project and one stitch. Let your hands learn the motion. Soon enough, you’ll find that you can personalize just about anything with a needle and thread. And when you hand your gift to someone, wrapped in time and care, you’ll see that it really is the small stitches that make the biggest impression.

GIPHY App Key not set. Please check settings