

 Z
Z
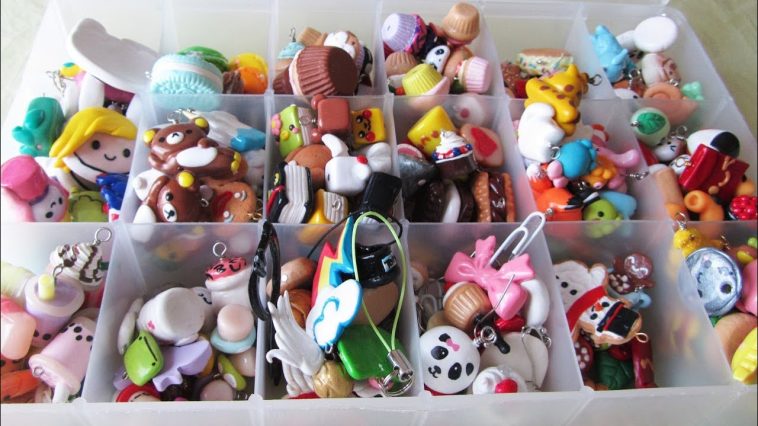
Making polymer clay charms has brought so much joy to my creative life. They’re fun, colorful, and completely customizable, which makes them perfect for gifts, keychains, zipper pulls, jewelry, or even keepsakes. The best part is that anyone can make them at home with just a few tools, a little clay, and a healthy dose of imagination.
In this DIY polymer clay charms tutorial, I’ll walk through the full process step by step. Whether you’re planning to create personalized gifts or just want a relaxing project to wind down your day, this guide will help you get started with confidence and spark plenty of design ideas along the way.
Supplies You Will Need
I always like to start with a well-organized workspace and everything laid out before me. Here’s the list of materials and tools I keep nearby for making charms:
- Polymer clay in various colors
- Blade or craft knife
- Needle or pin tool
- Rolling pin or acrylic roller
- Cutting mat or smooth work surface
- Eye pins or screw eyes
- Baking tray and parchment paper
- Oven (for baking clay)
- Optional: clay shaping tools, texture sheets, chalk pastels, paint, and varnish or glaze
I also keep some baby wipes or alcohol on hand to clean my tools and fingers when switching colors to avoid smudging.
Prepping the Clay
The first step in this DIY polymer clay charms tutorial is conditioning the clay. I take a small piece and knead it between my fingers or roll it with my acrylic roller until it becomes soft, pliable, and easy to shape. This is important for preventing cracks during baking and ensuring smooth, even shapes.
If I’m working on a detailed charm, I condition each color separately. It helps to keep the colors bright and prevents muddy blending.
Forming the Base Shape
Every charm starts with a simple base. For example, if I’m making a donut, I roll the clay into a ball, flatten it slightly, and then poke a hole through the middle. For fruit charms like strawberries or lemons, I start with a teardrop shape or sphere and adjust the details as I go.
I love how easy it is to turn basic forms into adorable figures. Rolling, pinching, and blending edges with a sculpting tool or even a toothpick gives me complete control over the look of each charm.
Adding Details and Texture
Details bring charm designs to life. I usually roll tiny bits of clay into shapes like sprinkles, eyes, or frosting layers and press them gently onto the base. A dotting tool or pin lets me poke tiny dots for freckles or patterns, and I’ll use a needle tool to add texture to things like fruit skin or fur on animal charms.
To create blushed cheeks or shading, I often shave a little chalk pastel and gently dab it onto the clay with a soft brush. It gives my charms a soft, realistic touch without needing to paint later.
One of the things I enjoy most in this DIY polymer clay charms tutorial is watching my characters take shape from such small components. The process is soothing and makes me feel like I’m bringing something special into the world.
Inserting Eye Pins
Before baking, I always insert eye pins or screw eyes into the charm where I plan to attach a jump ring or chain. This is crucial because inserting them after baking risks cracking the charm. I twist the eye pin gently into the clay, making sure it’s centered and deep enough to hold firmly.
If a charm is very small or delicate, I sometimes bake the pin separately and glue it in afterward using a strong adhesive, but generally, I prefer embedding it directly before baking for the strongest hold.
Baking the Clay
The key to baking polymer clay correctly is following the temperature instructions on the clay packaging. Most brands recommend baking at 265 to 275°F for 15 to 30 minutes per 1/4 inch of thickness.
I line a baking tray with parchment paper and preheat my oven before placing the tray in the center. To prevent browning, I tent a piece of foil loosely over the charms. Once baked, I let them cool completely before handling.
In this DIY polymer clay charms tutorial, I cannot stress enough how crucial baking is. Overbaking leads to discoloration, while underbaking results in fragile, breakable pieces. Getting it right makes all the difference.
Painting and Finishing Touches
After cooling, I sometimes enhance my charms with extra paint details. Acrylic paint works best for things like tiny expressions or outlines. I use a small brush and go slowly, allowing each layer to dry before moving on.
Once I’m satisfied, I seal the charm with a thin coat of gloss varnish. This step gives the piece a finished look and protects the surface. For matte finishes, I use a matte glaze, but for charms like food or candy, I usually go with a shiny glaze that makes them pop.
Turning Charms into Gifts
Now that I’ve covered the steps to making the charms, the fun part begins, deciding how to gift them. Here are some of my favorite ways to turn polymer clay charms into thoughtful handmade presents:
Keychains
I attach the charm to a jump ring, then hook it onto a keyring. These make adorable backpack or purse accessories, especially when customized with someone’s initials or favorite things.
Bracelets and Necklaces
A charm on a delicate chain or leather cord becomes wearable art. I love making themed charm bracelets, like sea creatures, sweet treats, or mini succulents.
Zipper Pulls
Adding a charm to the zipper of a pencil pouch, wallet, or hoodie gives it personality. These make great back-to-school gifts or party favors.
Bookmarks
I glue the charm onto the end of a ribbon and trim the opposite side into a point or V. It turns into a lovely little bookmark that adds joy to reading time.
Gift Embellishments
A small charm tied to a wrapped present adds a handmade touch and doubles as a keepsake. I’ve even used them as unique name tags for holiday gifts.
Fun Theme Ideas
One thing I love about this craft is how versatile it is. This DIY polymer clay charms tutorial wouldn’t be complete without a list of fun themes you can try:
- Food Charms: Mini pizzas, donuts, cupcakes, sushi, burgers, and fruit
- Animal Charms: Cats, foxes, turtles, pandas, birds
- Seasonal: Pumpkins for fall, snowflakes for winter, flowers for spring
- Hobbies and Icons: Cameras, paint palettes, musical notes, books
- Fantasy: Unicorns, dragons, potions, stars, moons
You can create sets around birthdays, holidays, or inside jokes. That level of personalization turns a tiny charm into a meaningful gift.
Tips for Best Results
Over time, I’ve discovered a few helpful tips to improve the quality of my polymer clay charms:
- Always wash hands and tools before using light-colored clay to avoid color transfer.
- Work on a clean, smooth surface to prevent lint or debris from sticking to the clay.
- Use translucent liquid clay as “glue” between layers to help them bond better.
- Rotate your tray halfway through baking to ensure even heating.
- Keep designs simple at first. Complexity can always be added later with confidence.
I also keep a notebook where I sketch charm ideas or jot down notes about which colors I used and how long I baked certain shapes. It helps me stay organized and plan future projects more efficiently.
Mistakes to Avoid
Even though polymer clay is very forgiving, a few common mistakes can trip up beginners:
- Overhandling clay: Too much handling can cause it to warm up too much and become sticky.
- Skipping conditioning: This leads to weak or brittle results.
- Not securing eye pins: They may fall out if not embedded deeply or glued properly.
- Baking at the wrong temperature: Always double-check the label on your specific brand of clay.
Thankfully, mistakes often teach more than perfect projects. Many of my favorite charm designs were discovered when I improvised to fix something that didn’t go as planned.
Wrapping Up Your Handmade Gift
After completing the charm and assembling it into a gift, I like to present it with as much care as I put into making it. Here are a few easy presentation ideas:
- Small drawstring pouches: These add a rustic or cozy feel and are reusable.
- Mini gift boxes: I line them with tissue paper and maybe a handwritten tag.
- Custom card mounts: I tape the charm onto a card with a pun or sweet message like “You donut know how awesome you are.”
Presentation matters just as much as the charm itself. I always try to make the entire experience feel special from start to finish.
Final Thoughts
This DIY polymer clay charms tutorial is just the beginning of what’s possible with a little clay and a lot of heart. Each charm I make feels like a tiny story in my hand, shaped with care and given with love. Whether you’re making one charm or a whole collection, the process is incredibly rewarding.
I hope this guide inspires you to try making your own charms, to experiment with colors and styles, and to share them with the people who matter to you. These small pieces may seem simple, but they carry a warmth and creativity that store-bought gifts can’t replicate.
With each roll, press, and bake, you’re not just shaping clay, you’re crafting a memory.

GIPHY App Key not set. Please check settings