

 Z
Z
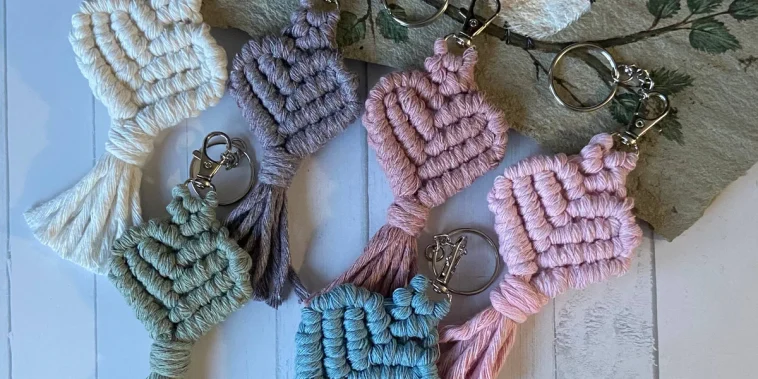
Creating beautiful handmade items doesn’t have to be complicated. One of the most satisfying and quick DIYs I’ve added to my crafting repertoire is making macrame keychains. They require only a few materials, don’t take up much space, and the results look stunning and professional. This easy macrame keychain tutorial will guide you step by step, whether you’re brand new to macrame or just looking for your next project.
Not only are macrame keychains functional, but they also make thoughtful gifts. I’ve made them for friends’ birthdays, holidays, and even as party favors. With just a bit of cord and creativity, you can craft something that feels personal and meaningful.
What You’ll Need
Before jumping into this easy macrame keychain tutorial, it’s important to gather your materials. Luckily, this project doesn’t require a lot.
Here’s what I use every time I make a macrame keychain:
- Macrame cord (3 mm cotton cord works great)
- Keychain clasp or ring (lobster clasp or split ring)
- Scissors
- Tape or clipboard to secure your project while working
- Comb (if you want to fringe the ends)
- Measuring tape or ruler
I like using colorful cotton cord, but you can choose neutrals for a minimalist look or bright shades for a pop of fun. You can even mix two or more colors to add a little complexity without changing the knots.
Preparing Your Cord
For a standard macrame keychain that is about five inches long, I cut three cords to 24 inches each. This gives me enough length to tie all the knots and leave room for a fringe or tassel at the bottom. If you plan to do more intricate designs, you might need longer cords.
To start, I fold each cord in half and attach them to the keyring using a lark’s head knot. This means taking the folded end, placing it behind the ring, pulling the ends through the loop, and tightening. Once all cords are attached, you’ll have six working strands.
This step sets the foundation, and the rest of the easy macrame keychain tutorial builds from here.
Basic Knots You’ll Use
If you’re new to macrame, don’t worry. There are just a few basic knots to learn, and once you master them, the rest flows easily.
Square Knot
This is the most common macrame knot and forms the basis of many designs. It’s made with four cords at a time, two in the center and two working cords on either side.
Here’s how I make a square knot:
- Take the left cord and cross it over the center cords, forming a loop.
- Bring the right cord over the left cord, then under the center cords, and through the loop on the left side.
- Pull both side cords to tighten.
- Repeat the same steps in reverse (start with the right cord) to complete the square.
I usually make a series of square knots, which creates a solid and uniform pattern.
Spiral Knot
The spiral knot is a half square knot repeated on the same side. It naturally starts to twist, creating a beautiful spiral effect.
I like using spiral knots when I want the keychain to have a bit of movement or texture. It gives a playful, boho vibe.
Finishing Knot
Once I reach the desired length, I finish off the design with a gathering knot. To do this:
- Cut a short piece of cord, about 8 inches long.
- Hold it against the cords where you want the gathering to start, forming a loop at the bottom.
- Wrap the long end tightly around all the cords several times, working downward.
- Tuck the end through the loop and pull both ends to secure.
- Trim the excess and hide the tails under the wraps.
This creates a neat and tidy finish, holding everything together securely.
Step-By-Step Keychain Pattern
Now that you’ve got the knots down, here’s a full pattern for a simple yet beautiful design I often use. This pattern works well for beginners and is easily customizable.
- Cut three cords, each 24 inches long.
- Attach them to the keyring using lark’s head knots.
- You’ll now have six strands.
- Make four square knots with the first four cords.
- Move one cord from the left and one from the right to the center.
- Make four square knots with the new center group.
- Continue this pattern, shifting cords and building a diamond or arrow shape.
- Finish with a gathering knot.
- Trim the ends evenly and comb out the fringe if desired.
This pattern gives the keychain visual interest without being too complicated. Once I got comfortable with it, I started experimenting with beads, alternating colors, and adding charms.
Adding Decorative Elements
To personalize your keychain even more, you can add beads between knots. I prefer wooden beads or acrylic ones that match my color scheme. Slide them onto the center cords before completing a knot to hold them in place.
You can also attach small tassels, charms, or initials to the bottom or clasp to reflect the personality of the recipient. These small details take a keychain from nice to unforgettable.
I often pair keychains with other small handmade gifts, like a card or pouch, and they make a perfect little bundle.
Styling and Finishing Touches
Once the knots are done and the gathering knot is tied, the finishing step is trimming and fringing the ends.
I measure from the knot and cut all cords to the same length, usually around one or two inches. If I want a polished look, I leave them straight. For a softer, fluffier finish, I unravel the cords and brush them out with a fine-toothed comb.
Sometimes I dip-dye the fringe or use fabric paint to create a dipped look. Just be sure to let it dry completely before packaging or using.
A light spritz of water and a quick press with a warm iron can help the keychain lay flat if it curled during knotting.
Gift Ideas and Occasions
Macrame keychains are incredibly versatile. I’ve made them for nearly every occasion, and they never fail to impress.
Here are just a few ideas where this easy macrame keychain tutorial can come in handy:
- Birthday party favors in each guest’s favorite color
- Teacher appreciation gifts with initials or apple charms
- Baby shower tokens in pastel shades
- Wedding party gifts coordinated with the color theme
- Graduation tokens with the year added in a tag
- Holiday stocking stuffers or Secret Santa surprises
Each one is quick to make but feels meaningful and thoughtful. When people find out they’re handmade, they often ask for the tutorial or want one in another color.
Customization and Creativity
Once you’re confident with the pattern, it’s easy to branch out. I like playing with different cord types, metallic thread for glam looks or jute for a rustic vibe. Combining two cord colors also adds interest.
Sometimes I use a larger ring and attach two keychains side by side, mirroring the pattern. Or I attach the keychain to a zipper pull on a backpack or tote instead of keys.
The beauty of this easy macrame keychain tutorial is that it leaves room for interpretation. I’ve taught it in craft classes, shared it at meetups, and even used it as a calming weekend project when I want to unplug and create something tangible.
Troubleshooting and Tips
Every once in a while, a knot might slip or a cord may end up uneven. Here’s how I avoid common problems:
- Uneven cords: Always measure carefully and double-check before cutting.
- Twisting patterns: Make sure your square knots alternate sides evenly.
- Loose knots: Pull each cord firmly and evenly as you go.
- Fraying ends: Use sharp scissors and apply a dab of clear glue or fabric stiffener.
I’ve learned that mistakes are just part of the process. If I mess up, I backtrack, undo a few knots, and try again. The flexibility of macrame is one of its greatest strengths.
Storing and Packaging
If you’re making multiple keychains for an event or as gifts, keeping them safe and organized is key. I like to hang mine on a clothesline with clothespins while they’re in progress.
When it comes time to gift them, I attach each one to a piece of cardstock or slip it into a small linen bag. A handwritten tag with a name or message adds that final personal touch.
People love the fact that the gift is handmade, and when they realize how beautiful and useful it is, they often come back to ask for more.
Final Thoughts
This easy macrame keychain tutorial has become a go-to project for me. It combines creativity, simplicity, and practicality, all things I value in my DIY life. Whether you’re making just one or preparing a dozen for an event, the process is rewarding and the results are impressive.
It’s also a great way to introduce someone to macrame. You don’t need expensive tools or a big workspace, just a handful of cords, a ring, and your hands. The more you make, the more confident you’ll become in trying new designs and styles.
If you’ve been looking for a small handmade gift that carries a big impact, I truly believe macrame keychains are the answer. Give this tutorial a try and see where your creativity takes you. You might be surprised how something so simple can bring such joy.


GIPHY App Key not set. Please check settings