

 Z
Z
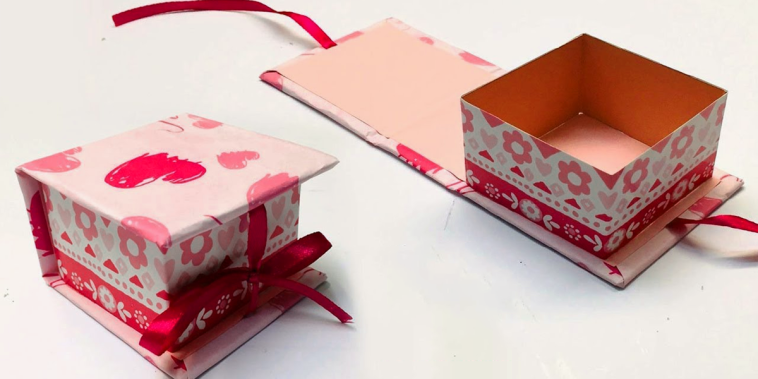
Crafting gifts has always been a passion of mine, but what truly takes a handmade present to the next level is packaging it in something just as unique. Learning how to make a DIY gift box from scratch transformed the way I give. A beautifully made box adds charm, warmth, and intention, turning even a simple item into a memorable keepsake. Whether you’re creating for a birthday, holiday, or just because, a handmade box brings an extra layer of thoughtfulness to any gift.
Making a gift box from scratch is easier than most people think. It doesn’t require fancy equipment or expensive materials, just a few basic tools and a willingness to be creative. The best part is that you can customize every detail to match your gift and the personality of the recipient. You can use any theme, size, or embellishment that feels right. In this article, I’ll walk through everything you need to know about how to make a DIY gift box from scratch, from materials and measurements to decorating and assembling.
Materials You Will Need
Before getting started, I gather all the necessary materials. Depending on the size and style of the box I’m making, these are the items I typically use:
- Cardstock or heavy-duty craft paper
- Ruler
- Pencil
- Scissors or craft knife
- Bone folder or back of a spoon for scoring
- Glue stick, double-sided tape, or tacky glue
- Decorative paper or embellishments
- Ribbon, twine, or tags for finishing
If I want a sturdier box, I use chipboard or recycled cardboard. For a lighter, decorative box, I stick with thick scrapbook paper or card-making stock.
Planning the Box Size and Shape
The size of the box depends on the gift I plan to place inside. I measure the item first and add about half an inch to an inch on all sides to give it room to breathe. I then decide whether I want a lid-and-base style box, a folding pillow box, or a one-piece tuck-in design.
For a classic square box with a separate lid, I usually create two identical square shapes, one slightly smaller for the base. For example, if I want the base to be 4 inches wide, I make the lid 4.1 inches wide so it fits snugly.
I also sketch out the design on plain paper first if I’m experimenting with a new shape. This helps me catch any mistakes before cutting into my good materials.
Making a Basic Square Gift Box
To create a basic square box from scratch, I follow these steps:
- Measure and draw the template:
On the back side of my cardstock, I draw a large square for the base and add flaps on each side. For example, a 6 by 6 inch base with 2-inch flaps results in a 10 by 10 inch square overall. - Score the fold lines:
Using a ruler and a bone folder, I score along the lines where the flaps meet the base. This makes folding the box easier and cleaner. - Cut and fold:
I snip along the vertical lines of the flaps so they can fold inward. Then I fold along each score line to start shaping the box. - Glue the flaps:
I apply glue or tape to the outer edges of the flaps and press them into place. This creates the sides of the box. I hold them together for a few seconds to make sure they stick. - Repeat for the lid:
For the lid, I use the same process but make the base square slightly larger, and the side flaps can be shorter if I want the lid to sit lower.
Once both pieces are dry, I test the fit and make small adjustments if needed.
Custom Shapes and Designs
Boxes don’t have to be square. I’ve experimented with all sorts of shapes to match the occasion:
- Pillow boxes for small items like jewelry or candies
- Hexagon boxes for something more eye-catching
- Heart-shaped boxes for Valentine’s Day
- Drawer-style boxes that slide open like a matchbox
- Pyramid boxes tied at the top for favors
Templates for these can be found online, but I often create my own by folding scrap paper until I find the right shape. Once the base shape is finalized, it can be traced onto cardstock and decorated any way I like.
Decorating the Gift Box
After assembling the structure, decorating is where I get the most creative. I treat the box as an extension of the gift. Sometimes I want it to match the theme of the contents. Other times, I simply use colors or textures that feel right for the recipient.
Here are some ways I decorate my DIY gift boxes:
- Wrap the exterior in patterned paper or fabric
- Use washi tape to create geometric designs
- Add a paper doily or lace overlay for elegance
- Paint the box with watercolors or metallic acrylics
- Attach small paper flowers, charms, or wooden shapes
- Use stamps or handwritten messages
- Tie ribbon or baker’s twine around the box and add a tag
For holiday boxes, I’ve added mini pinecones or sprigs of rosemary. For wedding favors, I’ve glued on initials or tiny pearls. These little details make a big impact.
Creating a Fold-Flat Box for Storage
I often make fold-flat boxes when I need to prep several at once, like for party favors or events. These are designed to fold down when not in use and pop open into shape when needed. The structure relies on precise scoring and folding techniques.
To make one:
- Draw a long rectangle with multiple evenly spaced panels
- Add tabs for gluing on one side
- Score and fold all edges
- Assemble by gluing the tab and pressing flat
I’ve used these for birthdays, small product packaging, and holidays. When stacked flat, they take up hardly any space.
Reinforcing the Structure
For heavier gifts, I reinforce the box by:
- Adding an extra layer of cardstock to the base
- Gluing strips of cardboard to the inside walls
- Lining the bottom with felt or foam for delicate items
This makes the box more durable and long-lasting, which is perfect for gifts that include fragile keepsakes, candles, or glass items.
Adding Compartments Inside
Sometimes the gift includes multiple small items like teas, bath bombs, or jewelry. To keep everything neat, I build compartments inside the box using cardboard dividers.
I cut strips of card, score them, and glue them together in a grid pattern. The dividers fit snugly inside the box and keep everything secure. It adds a nice surprise when the lid is lifted and the contents are beautifully arranged.
Making Mini Gift Boxes
Mini boxes are ideal for items like rings, mints, or notes. They don’t require much material and are quick to assemble. I use leftover cardstock or even old greeting cards to make them. A mini box can be slipped inside a larger gift or used on its own as a thoughtful gesture.
I’ve used mini boxes to hold:
- Birthday wishes
- Affirmation cards
- Jewelry
- Seeds for planting
- Small candies
They’re proof that size doesn’t matter when it comes to heartfelt gifts.
Themed Gift Box Ideas
Crafting themed boxes makes gift-giving more fun. Some of my favorite themed ideas include:
Spa Box:
Filled with mini bath bombs, salts, and a tealight candle. Decorated with calming colors, twine, and a eucalyptus leaf.
Tea Lover’s Box:
Includes different tea bags, honey sticks, and a reusable infuser. Decorated with vintage paper and pressed flowers.
Memory Box:
Packed with photos, letters, and small keepsakes. Decorated with soft tones, handwritten labels, and quotes.
Baking Box:
Includes recipe cards, cookie cutters, and sprinkles. Decorated with kraft paper and checkered ribbon.
The box becomes part of the story. When someone opens it, they feel the theme and intention you’ve put into the design.
Eco-Friendly Box Ideas
Making gift boxes also gives me a chance to reduce waste. I use recycled materials like cereal boxes, old magazines, or fabric scraps. Wrapping a box in pages from a vintage book or map creates a unique look. For added eco-friendliness, I use biodegradable glue and skip plastic embellishments.
One of my favorite eco-friendly touches is sealing the box with a wax stamp or paper sticker instead of tape. It looks beautiful and is compostable.
Tips for a Perfect Finish
Over time, I’ve learned a few tricks to make my boxes look more professional:
- Measure twice before cutting
- Score all folds before assembling
- Let glue dry completely before decorating
- Use a ruler as a guide for straight folds
- Sand edges if the cardstock is thick
- Store finished boxes in a dry place
Each box I make improves my technique. Practice makes the lines crisper and the designs more refined. Still, even the imperfect ones carry the charm of being handmade.
Final Thoughts
Learning how to make a DIY gift box from scratch has changed the way I give presents. It’s not just about wrapping, it’s about telling a story, creating an experience, and adding a personal touch that lasts long after the gift is opened. These boxes become keepsakes, often used again or displayed on shelves. They carry emotion, care, and creativity in every fold and corner.
Whether you’re making one box or ten, for holidays or just to brighten someone’s day, the process is both rewarding and joyful. All it takes is a little time, a few tools, and a whole lot of heart. Once you’ve made your first one, you’ll start seeing opportunities for custom boxes everywhere. From birthdays to weddings and all the little moments in between, a handmade box makes each gift unforgettable.

GIPHY App Key not set. Please check settings