

 Z
Z
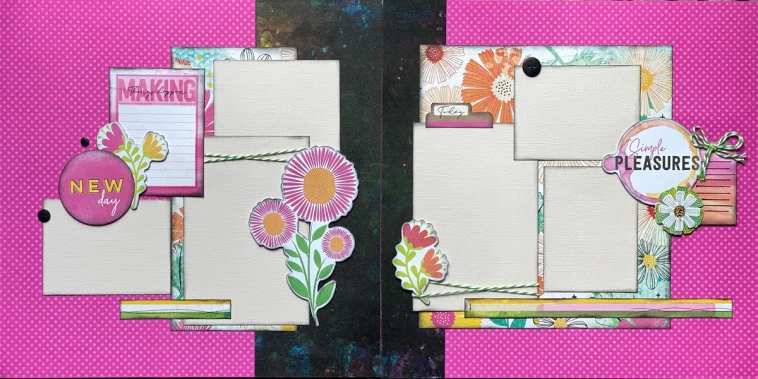
Scrapbooking is more than just a way to store photographs and keepsakes. It’s a form of creative storytelling, a celebration of life’s little moments preserved in color, paper, and texture. Learning how to make a scrapbook from scratch opens up a whole world of self-expression, and the best part is that no two books are ever the same.
Every page becomes a canvas where memories can live forever, surrounded by personal touches that make them even more special. I’ve found that crafting a scrapbook from the ground up makes it feel more personal and meaningful than using a store-bought version. The freedom to select my own materials and set the creative tone for each section adds an extra layer of joy to the process.
Gathering Materials
Starting a scrapbook requires only a few basic supplies, though you can expand your toolkit as you go. Here’s what I like to have on hand before diving in:
- Cardstock or heavy paper for the pages
- Chipboard or cardboard for the covers
- Glue sticks or double-sided tape
- Scissors and a craft knife
- A ruler or bone folder
- A hole punch or binding rings
- Photos, mementos, and printed quotes
- Pens, markers, and journaling supplies
- Decorative paper, washi tape, and stickers
I prefer acid-free materials to help preserve photographs and prevent yellowing over time. Choosing quality basics makes a difference, especially if the scrapbook is intended as a gift or family keepsake.
Designing Your Cover
The cover sets the tone for everything that follows. I often begin with chipboard or a thick piece of cardboard as the base. After measuring and cutting to the desired size, I wrap it with fabric, decorative paper, or even old maps to create texture and style.
To give the scrapbook a polished edge, I glue down the wrapping material neatly and add embellishments like die-cut letters, charms, or stamps. The title might be something simple like “Our Summer 2023” or “My Travel Diary.” Sometimes I let the pages define themselves later and leave the cover blank until the end.
Making your own cover is one of the most rewarding parts when figuring out how to make a scrapbook from scratch because it sets your project apart from any off-the-shelf option.
Binding the Book
There are several ways to bind your scrapbook. Some are super simple, while others add an artisan touch. I often use binder rings through punched holes because they let me add or remove pages as needed. If I want something sturdier, I’ll try a stitched binding with embroidery thread or use a Zutter Bind-It-All machine for a spiral-bound look.
For a basic do-it-yourself binding:
- Stack your pages and covers.
- Use a ruler to mark evenly spaced hole positions.
- Punch holes and line everything up.
- Thread binder rings, ribbon, or string through the holes and tie securely.
This structure is strong enough to hold up but flexible enough for creative layouts.
Planning the Layout
One thing I’ve learned is that diving into a scrapbook without a plan can lead to chaos. That’s why I take some time to decide how many pages I need and what memories I want to include.
Some of the most common scrapbook themes I’ve worked with include:
- Travel adventures
- Baby’s first year
- Wedding memories
- Graduation keepsakes
- Seasonal holidays
- Everyday life moments
Each page doesn’t have to be perfect, but giving each one a purpose makes it easier to design layouts. I usually sketch a quick plan before starting the final version.
Building the Backgrounds
Backgrounds create the base for each scrapbook layout. I like to start with 12-by-12-inch cardstock, though you can use any size that fits your cover. Lighter colors give space for journaling, while darker backgrounds are great for high-contrast images or bright embellishments.
Patterned paper is fun to work with, especially when layering. I’ll often use scraps, torn edges, or even bits of wrapping paper to add texture and depth. The key is to layer thoughtfully without making the page feel cluttered.
When learning how to make a scrapbook from scratch, background work is a crucial step that brings cohesion and visual appeal.
Adding Photos and Memorabilia
Photos are usually the highlight of any scrapbook. I often crop them into different shapes, add mats in complementary colors, or print them in black and white for a timeless look.
I also love including memorabilia like ticket stubs, postcards, pressed flowers, and handwritten notes. These small details bring each memory to life in ways that words or pictures alone can’t.
To avoid damage, I use photo-safe adhesives and avoid putting glue directly on irreplaceable keepsakes. Sometimes I make little pockets or envelopes inside the pages to hold delicate items like letters or concert wristbands.
Creative Journaling
Scrapbooks aren’t just visual. The words I include often become the soul of the story. I like to journal directly on the pages using archival pens in different colors. You can also print your journaling onto labels or slips of paper for a cleaner look.
Some prompts I use for journaling include:
- What was the highlight of this moment?
- What did I learn?
- How did I feel at the time?
- Who was with me?
Sometimes, just a few words beneath a photo can speak volumes. Other times, a full paragraph adds the depth that pictures alone can’t convey.
Embellishments and Details
This is where I get to be really playful. Stickers, buttons, sequins, lace, stamps, and rub-on transfers all find their way into my pages. I use embellishments to draw attention to key photos, balance out empty corners, and tie colors together.
Die cuts and paper punches help me shape elements into stars, hearts, and florals, which I layer using foam tape for dimension. Washi tape is another favorite, it’s great for borders, frames, and layering without making the page too heavy.
One rule I follow is not to overdo it. Each page should enhance the memory, not overshadow it.
Page Themes and Layout Ideas
Even when I don’t have a strict plan, themes help guide the aesthetic. Here are a few layout ideas I revisit regularly:
- Collage page: Several small photos arranged around a central theme
- Timeline layout: Events shown in chronological order with dates
- Grid layout: Clean and symmetrical arrangement with repeated patterns
- Single-photo focus: One image with lots of journaling and embellishment
By switching between styles, I can keep the scrapbook fresh and engaging without it feeling repetitive.
Adding Interactive Features
What I love most about scrapbooking is how interactive it can be. To surprise the viewer, I’ll add elements like:
- Flaps that lift to reveal journaling
- Mini envelopes with hidden notes
- Pull-out tags for secret messages
- Pop-up layers or fold-out pages
These simple additions bring a sense of discovery to each page, encouraging the viewer to look closer and engage with the content more deeply.
When figuring out how to make a scrapbook from scratch, experimenting with interactive features adds another layer of creativity to the process.
Finishing Touches
Once the pages are assembled, I take time to go through each one and make small adjustments. This might mean adding a label, straightening a photo, or filling in a journaling gap.
To protect the scrapbook, I often seal the cover with a light coat of matte Mod Podge or add clear acetate sheets inside the front and back covers. This keeps it safe from fingerprints and wear.
If the scrapbook is a gift, I tie it with a ribbon and include a personal note. It never fails to get a heartfelt reaction.
Displaying and Storing Your Scrapbook
After investing time and care into the project, I always look for the right way to display or store it. Some go on coffee tables, others onto bookshelves. For special ones like wedding scrapbooks or baby albums, I store them in keepsake boxes with tissue paper.
Scrapbooks make lovely heirlooms, and when built well, they can last for years. I’ve even started making digital versions to accompany the physical ones, so family members far away can enjoy them too.
Tips for Success
Through years of scrapbooking, I’ve learned a few tricks that make the process smoother:
- Start small: Don’t feel pressured to fill 50 pages. A mini scrapbook can be just as powerful.
- Stay organized: Use zip bags or folders to sort photos and mementos before starting.
- Test your layout: Arrange everything loosely before gluing it down.
- Use templates: Especially helpful for beginners when blocking out pages.
- Leave space: White space can be just as effective as embellishments.
Mistakes will happen, but they often lead to new ideas. When learning how to make a scrapbook from scratch, the process is as rewarding as the finished product.
Scrapbooking with Others
Scrapbooking can be a solo retreat or a social activity. I’ve hosted scrapbook nights with friends where we bring our materials, share tools, and enjoy the creative energy together. Everyone walks away inspired and recharged.
Group projects also make excellent gifts. For example, creating a memory book for a retiring coworker or a collaborative scrapbook for a bridal shower can be incredibly touching.
Why Handmade Matters
One of the most powerful aspects of making a scrapbook from scratch is the emotional weight it carries. I’ve seen people cry while flipping through pages I made for them, not because the materials were expensive, but because the effort was obvious and sincere.
In a digital age where so many memories live on screens, having something tangible, personal, and hand-crafted feels extra meaningful.
Whether you’re preserving a vacation, capturing a love story, or documenting daily joys, learning how to make a scrapbook from scratch gives you the power to celebrate life on your own terms. With paper, photos, and a little creativity, you can turn any collection of memories into something truly unforgettable.

GIPHY App Key not set. Please check settings