

 Z
Z
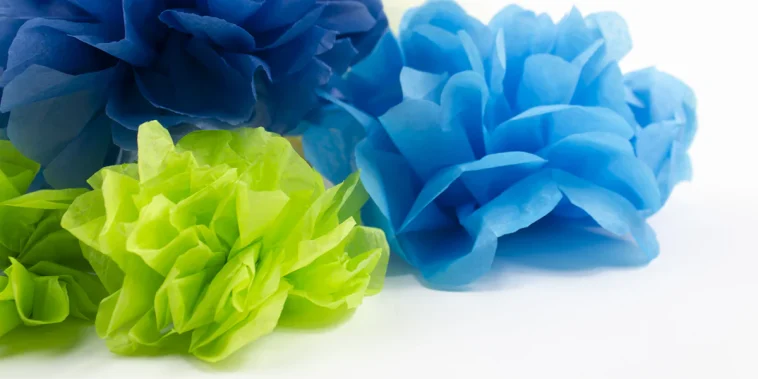
Paper flowers have a special kind of magic. They’re budget-friendly, customizable, and unlike real flowers, they never wilt. Over the years, I’ve spent countless hours shaping petals, curling edges, and building full blooms entirely from paper. What keeps me coming back to this craft is the joy of creating something so lifelike, people are often surprised to learn it’s not real.
Learning how to make paper flowers that look real is a rewarding process. It takes practice, yes, but with the right materials, techniques, and a little patience, anyone can achieve beautiful, botanical results. Whether you’re making them for home décor, weddings, gifts, or cards, realistic paper flowers can elevate any occasion.
This guide walks through everything I’ve learned about making realistic paper flowers. From tools and paper types to shaping techniques and finishing touches, I’ll share all the details that help bring these delicate blooms to life.
Why Realistic Paper Flowers Stand Out
There’s something deeply satisfying about crafting flowers that could be mistaken for real ones. Unlike simple cut-outs or childlike versions, realistic paper flowers mimic the structure, texture, and color gradients of their natural counterparts.
When I hand someone a bouquet of lifelike paper roses or display peonies on a table, it always draws attention. These flowers offer permanence, which makes them ideal for keepsakes or gifts that last. And unlike fresh blooms, I can control every element of the design, from color and size to the way each petal curves.
Selecting the Right Paper
The kind of paper you use makes a huge difference when learning how to make paper flowers that look real. I’ve experimented with everything from cardstock to tissue paper, but not all paper behaves the same.
Here are my go-to options:
- Crepe paper: This is my favorite for realistic flowers. It stretches, holds shape well, and comes in various weights. Heavy crepe works great for structural petals, while fine crepe gives a delicate, lifelike effect.
- Textured paper: Some specialty papers have a linen or handmade feel, which adds dimension. These work well for unique flowers like poppies or magnolias.
- Watercolor paper: Ideal when I want to add hand-painted color variations. It absorbs pigment beautifully and holds shape.
- Mulberry paper: Lightweight with a fibrous texture, perfect for layering.
I avoid overly glossy or stiff papers, as they tend to look artificial. A natural matte finish, with a slight translucency, mimics the softness of real petals.
Must-Have Tools and Supplies
Before getting started, I always gather my tools. While paper is the main ingredient, a few key supplies make the process smoother and more precise.
Here’s what I keep in my crafting space:
- Fine-tip scissors for cutting detailed petal shapes
- Floral wire for creating stems
- Floral tape to bind petals and stems
- A hot glue gun or tacky glue for secure adhesion
- Ball stylus or shaping tools to curve and vein petals
- Chalk pastels or watercolor paints for color accents
- Templates or petal pattern cutouts
- Ruler and pencil for measurements
- Wire cutters and needle-nose pliers for shaping stems
With everything in reach, it’s easier to stay in the flow while assembling a flower from start to finish.
Building Petals That Mimic Nature
Petal shape and movement are what truly define a realistic flower. I always start by studying real blooms or looking at reference photos. Nature isn’t symmetrical, so I keep that in mind while designing each petal.
I cut each petal individually instead of stacking paper, which adds natural variation. Then I use shaping tools, my fingers, the edge of a pencil, or a ball stylus, to gently curl and bend the edges. Crepe paper is ideal for this because the grain allows me to stretch and shape it exactly how I want.
When layering petals, I stagger them slightly and rotate angles so the flower opens like a real blossom. This small adjustment makes a big difference in how authentic the final piece looks.
Adding Color and Depth
Even if I start with colored paper, I often enhance the petals with extra shades to give depth. Real flowers aren’t one flat color, they have veins, shading, and subtle color shifts.
To achieve that effect, I use chalk pastels or watercolor paints. I brush a darker hue on the base or edges of the petals, or a lighter one toward the tips. For certain flowers, like anemones or tulips, I might add fine lines to mimic natural veins.
The trick is subtlety. I apply a little at a time, blend gently with a sponge or my fingertip, and step back to see the overall look. These details really help when learning how to make paper flowers that look real.
Constructing the Flower Center
The center of the flower sets the tone for the rest of the bloom. I often spend just as much time getting the center right as I do making the petals.
For roses or peonies, I create tight inner petals and wrap them with more open ones. For daisies or poppies, I might use fringed paper or a rolled ball of crepe for the middle. Sometimes I’ll paint a gradient or add a few dots of contrasting color to add realism.
Using floral wire, I pierce the center through to build the flower outward. Each layer gets glued or taped to the base, and I shape as I go.
Assembling the Flower
Once all the pieces are shaped and colored, I assemble them on a wire stem using glue and floral tape. I start from the center and build outwards, pressing each petal in place and letting the glue set.
I wrap the base of each petal with floral tape, which holds everything tightly and blends in with the stem. Some flowers need three or four layers of petals to look full, while others, like wildflowers, look best with fewer layers.
At this stage, I rotate the flower in my hand constantly, adjusting petal direction and height to match real-life angles. I might bend the wire slightly to make the flower tilt like it’s reaching for the sun.
Creating Realistic Leaves and Stems
No flower is complete without its leaves and stems. I cut leaves from green crepe or textured paper and add veins with a stylus or back of a knife. For extra realism, I paint shadows along the center vein or add a bit of yellow or brown.
Leaves are attached to the floral wire stem with more tape, just like petals. I also cover the entire wire with floral tape to give it a more organic, finished look. For large bouquets, I sometimes wrap several stems together to form thicker branches.
Tips for Realism and Balance
The secret to how to make paper flowers that look real lies in a few specific touches:
- Use varied shades of the same color for petals
- Don’t aim for perfect symmetry
- Mix textures by using different weights of paper
- Add bends to petals and leaves for movement
- Let some edges curl or twist naturally
- Layer petals gradually instead of evenly spacing them
- Combine open and closed blossoms in an arrangement
I also avoid using too much glue, which can seep and harden, making the flower look artificial. Instead, I apply glue sparingly and press gently so the paper holds shape.
Displaying and Gifting Paper Flowers
Once finished, there are so many ways to showcase paper flowers. I’ve placed them in vases, attached them to wreaths, glued them on gift boxes, and even turned them into corsages. For weddings or parties, they’re perfect for centerpieces, boutonnieres, and garlands.
When giving them as gifts, I wrap them in tissue paper and tie with ribbon, just like a real bouquet. The look on someone’s face when they realize the flowers are handmade always makes the time spent worth it.
These flowers also ship well, since they don’t need water or refrigeration. I pack them with paper filler and secure them gently to avoid crushing.
Project Ideas Using Realistic Paper Flowers
Now that you know how to make paper flowers that look real, here are a few ideas to inspire your next project:
- Seasonal wreaths with paper roses, magnolias, or poinsettias
- DIY floral wall art using shadow boxes or wood frames
- Gift toppers for birthday or Mother’s Day presents
- Photo backdrops for events and celebrations
- Flower crowns for festivals or weddings
- Greeting cards with small blossoms attached
- Paper flower bouquets for bridal showers, anniversaries, or table décor
Each of these projects allows you to use different flowers and techniques. I like to rotate between big blooms like dahlias and tiny accents like baby’s breath for variety.
Common Mistakes to Avoid
Every craft has a learning curve, and paper flowers are no exception. Here are a few missteps I made early on, so you don’t have to repeat them:
- Using stiff, glossy paper that won’t shape well
- Gluing petals too close or too far apart
- Forgetting to add color depth
- Overloading with glue and flattening details
- Making all petals the same size or shape
Now I treat every flower like a small sculpture. I slow down, tweak as I go, and aim for natural flow instead of perfection.
Final Thoughts
Learning how to make paper flowers that look real is a craft that brings joy long after the glue dries. Each bloom I make is a tiny reminder of nature’s beauty, recreated with simple tools and my own hands.
Whether you’re making a single rose for a card or a full bouquet for a friend, the key is in the details. Study real flowers, be patient with shaping, and trust your eye to guide you.
Every time I finish a flower, I’m reminded of why I started in the first place. The process is calming, the result is rewarding, and the possibilities are endless.
Let your creativity bloom, one petal at a time.

GIPHY App Key not set. Please check settings