

 Z
Z
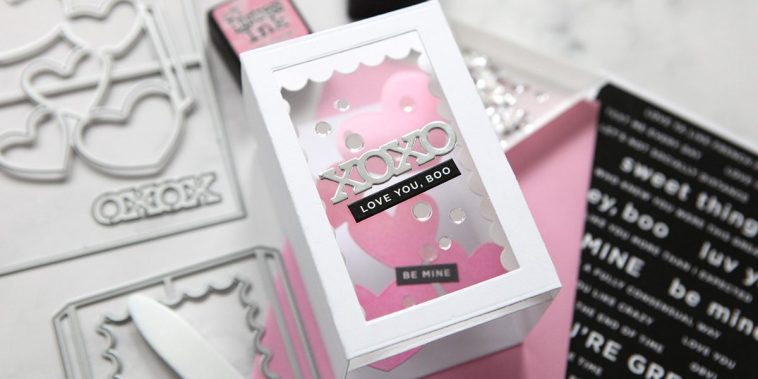
Cardmaking has become one of my favorite ways to express creativity and share thoughtful moments with others. Among all the techniques I’ve tried, nothing adds quite the same charm as stamping and embossing. In this guide on how to use stamps and embossing for cardmaking, I’ll take you through the tools, materials, and techniques I rely on to create professional-looking cards that people love to receive.
There’s a real joy in building layers of texture and dimension into a simple piece of cardstock. With stamps, I can add intricate illustrations and repeatable designs without having to draw by hand. Embossing, whether dry or heat-based, brings depth and shine that turns an ordinary design into something elegant and special.
I’ll walk you through each step I use to create beautiful, handmade cards using stamps and embossing. Whether you’re just getting started or looking to refine your process, this guide will help you confidently explore this timeless cardmaking method.
Essential Tools and Materials
Before diving into how to use stamps and embossing for cardmaking, let’s talk supplies. Here’s what I use regularly when working with these techniques:
For stamping:
- Clear or rubber stamps
- Acrylic blocks for mounting clear stamps
- Dye or pigment ink pads in various colors
- Specialty stamp cleaner or a damp cloth
- High-quality cardstock or blank cards
For embossing:
- Embossing ink pad or embossing pen
- Embossing powders (metallics, glitters, colors)
- Heat tool (not a hairdryer, as it doesn’t get hot enough)
- Anti-static powder tool or embossing buddy
- Dry embossing folders and embossing machine, if using dry embossing
Having these basics ready makes it easy for me to jump into a project whenever inspiration strikes.
Preparing the Card Base
When working with stamps and embossing, it helps to start with a clean, flat card base. I usually use 110 lb smooth white cardstock, since it handles ink well and stands up to the heat from embossing.
I cut the paper down to the size I want, typically 5 by 7 inches or 4.25 by 5.5 inches, and score it down the middle for a clean fold. A bone folder helps keep the edges crisp and gives the card a neat finish.
From here, I decide on the card’s layout, where I want my sentiment, focal image, or border pattern. Light pencil marks help guide my stamp placement.
Using Stamps for Detail and Personality
Stamps bring personality to a card without requiring advanced drawing skills. I love using them to add floral borders, background textures, cute animals, or handwritten-style quotes.
Here’s how I use them:
- Mounting the stamp – If I’m using a clear stamp, I peel it from the plastic sheet and press it onto an acrylic block. Rubber stamps usually come mounted on wood, so they’re ready to go.
- Inking the stamp – I gently tap the stamp onto an ink pad until it’s evenly coated. Pressing too hard can overload the design and cause smudging.
- Stamping the image – I press the stamp straight down onto my card, applying even pressure. I avoid rocking it side to side, which can blur the image.
- Cleaning the stamp – Right after stamping, I clean the stamp with a soft cloth or stamp cleaner to keep it in good condition.
This part of how to use stamps and embossing for cardmaking is all about practice. With time, I’ve learned to control pressure and placement for clean, repeatable results.
Layering Stamp Designs
To build more dynamic cards, I layer different stamped images. I often start with a light-colored background stamp, then add bolder focal points on top.
Masking is another technique I like to use. I stamp the main image on the card, then stamp it again on a scrap piece of paper, cut it out, and place it over the original. This lets me stamp background images around it without overlapping, creating depth.
Heat Embossing for Glossy Dimension
One of the most rewarding parts of how to use stamps and embossing for cardmaking is heat embossing. Watching powder melt into shiny, raised lettering or designs never gets old.
Here’s how I do it:
- Prep the surface – I gently rub an anti-static powder tool over my card to prevent the embossing powder from sticking where it shouldn’t.
- Stamp with embossing ink – I use a clear embossing ink pad, which feels a bit sticky. I stamp my design just like I would with regular ink.
- Apply embossing powder – I sprinkle embossing powder over the stamped image, making sure it’s fully covered. Then I tap off the excess onto a scrap sheet of paper and return the leftovers to the jar.
- Heat the design – I turn on my heat tool, let it warm up for a few seconds, and hold it about two inches from the card. As the powder melts, it changes from grainy to shiny or glossy.
- Let it cool – The design sets quickly, but I give it a moment before touching it to avoid smudging.
I like mixing different powder finishes, glossy black for outlines, gold for elegance, or white on dark cardstock for a chalkboard effect.
Combining Stamping and Heat Embossing
Some of my favorite cards blend both stamping and heat embossing. For example, I might stamp a floral border with regular ink, then add a heat-embossed quote in the center. Or I’ll emboss the outline of a flower in gold and use watercolor or ink to fill it in.
Layering ink and embossed textures brings richness to the card. It looks detailed, but the process is surprisingly manageable once you get into the rhythm.
Dry Embossing for Tactile Texture
Another way I use embossing is with embossing folders and a die-cutting machine. These tools press patterns into paper, creating raised textures without heat.
To do this:
- I place the cardstock inside an embossing folder with the design facing up.
- I run the folder through my embossing machine, usually between two plastic cutting plates.
- The result is a raised design that adds dimension and elegance.
I use dry embossing for backgrounds, borders, or accents. Swirls, stripes, dots, and floral patterns work beautifully. Sometimes I lightly rub ink over the raised surface to highlight the texture.
Designing Cards for Different Occasions
When I think about how to use stamps and embossing for cardmaking, I always consider the occasion. Here are some of the ways I tailor designs:
Birthday Cards
For these, I use playful stamps, balloons, candles, confetti, and bold colors. I love heat embossing the words “Happy Birthday” in gold or silver.
Thank You Cards
I lean into floral stamps and elegant fonts. White embossing powder on colored cardstock looks classy and warm.
Holiday Cards
Heat embossing works especially well for snowflakes, stars, and pine trees. I like using metallic powders for that festive shine.
Wedding and Anniversary Cards
Lace patterns, hearts, and custom messages embossed in gold or rose gold create a romantic and timeless feel.
Just Because Cards
These are great for experimenting. I’ve used animal stamps, nature scenes, and watercolor backgrounds with embossed quotes like “You’re amazing” or “Thinking of you.”
Tips for Better Results
Mastering how to use stamps and embossing for cardmaking takes a little trial and error. Here are some tips that help me avoid common mistakes:
- Stamp on a flat, hard surface to prevent blurry impressions
- Use the right ink, pigment inks are best for embossing, while dye inks dry fast and are great for layered stamping
- Let layers dry fully before adding more elements
- Keep embossing powders sealed and store them in a dry place to avoid clumping
- Always test new stamps on scrap paper before applying them to your card
- Use tweezers when heat embossing small pieces to avoid burning fingers
I’ve ruined a few cards in my early days by rushing or overheating, but now I enjoy the slow, deliberate process.
Creating Sets and Themes
One fun way I use these techniques is by creating matching card sets. I’ll pick a stamp set, like a collection of succulents or vintage frames, and design several cards using the same theme but in different colors or formats.
I also like to create seasonal sets, like a bundle of embossed thank you cards for autumn or bright, stamped birthday cards for spring.
These sets make lovely gifts. I package them in handmade envelopes or tuck them into a decorated box tied with ribbon.
Organizing Stamps and Powders
As my collection has grown, I’ve learned to stay organized. I store my stamps in clear plastic sleeves in labeled bins, sorted by theme, floral, holiday, sentiments, and so on.
My embossing powders live in clear containers with wide mouths, which makes it easier to pour the excess back in. I label each one with its finish, glossy, matte, glitter, pearl, so I can grab what I need quickly.
Having an organized workspace makes it easier to focus on the fun part, designing cards that brighten someone’s day.
Final Thoughts
Learning how to use stamps and embossing for cardmaking opened up an entirely new level of creativity for me. Whether I’m sending a heartfelt thank you or just letting someone know I’m thinking of them, these techniques help me create cards that feel personal and special.
The beauty lies in the details, shiny embossed lettering, crisp stamped images, and layered textures that feel good to the touch. With a few essential tools and a bit of practice, anyone can master these techniques and create cards that people treasure.
So if you’ve been curious about adding more dimension and design to your cardmaking projects, I hope this guide helps you jump in with confidence. Once you start combining stamps and embossing, the possibilities are endless.

GIPHY App Key not set. Please check settings