

 Z
Z
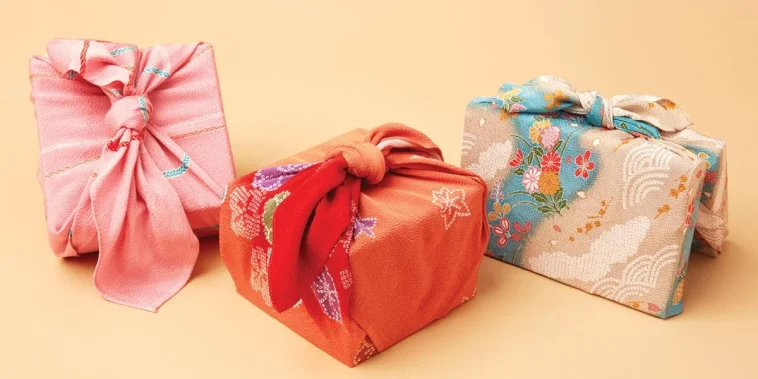
Making some personalized gifts has always brought me joy, especially when I can keep things simple and practical. One of my favorite creations is the no-sew fabric pouch. It’s quick to make, surprisingly sturdy, and versatile enough to suit any occasion. Whether filled with sweet treats, bath salts, handmade jewelry, or small keepsakes, a pouch like this adds a special handmade touch to any gift. In this article, I’ll walk you through how to make a no-sew fabric pouch gift using materials you likely already have at home. I’ll also share design tips, creative uses, and ways to personalize each pouch so it feels truly one-of-a-kind.
Learning how to make a no-sew fabric pouch gift has been a game-changer for my DIY projects. It’s easy enough for beginners, fun for kids, and elegant enough to use for weddings, holidays, and birthdays. The best part is, there’s no need to haul out the sewing machine or worry about stitching straight lines. You can complete one pouch in under 30 minutes, and once you get the hang of it, making a batch for party favors or holiday gifts becomes a breeze.
Supplies you’ll need
Before I dive into the steps, let me list what you’ll need to gather for this project. The materials are simple and inexpensive, making this a perfect craft even on a tight budget.
- Fabric square, preferably cotton or linen, between 10×10 and 12×12 inches
- Fabric glue or hot glue gun
- Ribbon, twine, or cord for the drawstring
- Fabric scissors or rotary cutter
- Ruler and pencil or tailor’s chalk
- Decorative extras like fabric paint, iron-on patches, buttons, or stamps
Optional:
- Pinking shears for decorative edges
- Fusible webbing for a cleaner fold
- Safety pin or bodkin for threading ribbon
Once I have these materials ready, I can start the fun part, designing and assembling the pouch.
Picking the right fabric
When deciding how to make a no-sew fabric pouch gift, I always start by choosing the right fabric. I prefer working with cotton because it folds well and holds shape without being too stiff. Linen is also a beautiful option for rustic or minimalist styles.
For colorful or themed pouches, I often go with patterned fabrics or batiks. If I want a luxurious feel, I sometimes use velvet or silk, though they can be more slippery to handle. The key is to pick a fabric that suits the occasion and reflects the recipient’s personality.
Cutting and prepping the fabric
I start by measuring and cutting a square of fabric. A 10×10 inch square works well for small gift pouches, but I sometimes go up to 12×12 or larger if I need to fit bulkier items. I make sure the edges are even and clean.
To prevent fraying, I use pinking shears or apply a thin line of fabric glue along the edge. Alternatively, folding over the edges by a quarter inch and gluing them down creates a neat, finished look.
This step sets the foundation for a polished pouch and makes the rest of the project go smoothly.
Creating the drawstring channel
The next step in how to make a no-sew fabric pouch gift is preparing the channel for the drawstring. About an inch from the top edge of the fabric, I fold the fabric over toward the inside and glue it down to form a casing. I make sure the glue is applied evenly and allow it to dry fully before moving on.
I leave a small opening on each side of the pouch where the drawstring will come out. This folded edge becomes the casing for the ribbon or twine, allowing the pouch to cinch closed.
To help guide the ribbon through later, I sometimes insert a drinking straw or dowel while the glue is drying, then slide it out when it’s done.
Folding and assembling the pouch
Once the drawstring casing is complete, I fold the fabric square in half, right sides together. I align the edges and glue along both side seams, starting just below the drawstring casing and going all the way to the bottom corners. Then I press the seams together firmly and let them dry.
After drying, I turn the pouch right side out by pulling it through the open top. The pouch is already taking shape at this point. I check that the seams are strong and the corners are crisp. If I need to reinforce any areas, I add a bit more glue and press again.
Adding the drawstring
To thread the ribbon or twine through the casing, I attach it to a safety pin and feed it through one side of the casing and out the other. I use a ribbon about 20 inches long so there’s enough slack to tie a bow or knot. If I want a double-drawstring, I thread another piece from the opposite direction.
Once both ends are through, I knot them or add beads to keep the ribbon from slipping out. When the drawstring is pulled, the pouch gathers neatly and closes securely.
This simple mechanism makes the pouch functional and elegant without a single stitch involved.
Decorating the pouch
This is where creativity really takes off. Now that I know how to make a no-sew fabric pouch gift, I can have fun personalizing it. Here are a few of my favorite decorating methods:
- Fabric paint: I use stencils or freehand designs to paint initials, patterns, or seasonal motifs. Metallic paint gives a luxe feel, while bright colors pop against darker fabric.
- Iron-on patches: These are great for themed gifts like travel, pets, or hobbies. A patch adds color and texture without requiring any sewing.
- Stamps and ink: Textile-friendly ink pads let me stamp messages or icons onto the pouch. I sometimes use alphabet stamps to spell out the recipient’s name.
- Buttons and beads: These can be glued near the top edge or drawstring ends for added charm.
- Lace or trim: I glue a strip of lace along the bottom edge or use decorative trim around the top casing to elevate the look.
Each embellishment adds personality and transforms a simple pouch into a thoughtful treasure.
What to put inside your pouch
One reason I love learning how to make a no-sew fabric pouch gift is the versatility of what I can tuck inside. Here are some go-to ideas that pair perfectly with handmade pouches:
- Candies or homemade treats
- Lip balm, nail polish, or compact mirrors
- Tea bags or coffee sachets
- Bath salts or mini soaps
- Jewelry or crystals
- Gift cards or notes
- Seeds for gardening lovers
Each of these items turns the pouch into a complete gift, tailored to the recipient’s interests and tastes.
Themed pouch ideas
To make the pouches even more special, I often craft them around a theme. Here are a few creative combinations:
- Spa pouch: Include a lavender sachet, face mask, and mini lotion
- Birthday pouch: Add confetti, a party blower, and a handwritten birthday message
- Traveler’s pouch: Tuck in a luggage tag, hand sanitizer, and a travel quote card
- Holiday pouch: Use seasonal fabric and fill with small ornaments or chocolates
- Book lover’s pouch: Add a handmade bookmark, tea bag, and a favorite quote
Themes help me stay organized when making multiple gifts at once and ensure each pouch feels cohesive and thoughtful.
Eco-friendly options
If I want to make my gift more sustainable, I use upcycled or natural materials. Old shirts, pillowcases, and cloth napkins all make great sources of fabric. I’ve also used linen scraps from larger projects or cut fabric from vintage scarves.
For the drawstring, jute twine, recycled ribbon, or even a strip of torn fabric work beautifully. These eco-friendly touches not only reduce waste but also give the pouch a unique story behind it.
Tips for success
Over time, I’ve picked up a few helpful tips to make this project smooth and enjoyable:
- Let glue dry fully before turning or using the pouch
- Use clips or clothespins to hold seams together while the glue sets
- Avoid using too much glue, it can seep through the fabric
- Measure and fold carefully for clean, symmetrical results
- Test the drawstring before finalizing the pouch to ensure it moves smoothly
These small details add up and make the pouch look polished and professional.
Packaging and presentation
The way I present the pouch often enhances the gifting experience. If I’m giving it as part of a larger package, I might place it in a gift box or pair it with a handwritten card. For individual pouches, I tie the drawstring in a bow and add a tag with the recipient’s name.
If I’m mailing the gift, I place the pouch in a padded envelope with tissue paper. It travels well and arrives looking just as lovely as when it left my hands.
Final thoughts
Learning how to make a no-sew fabric pouch gift has made gift-giving more creative and joyful. These pouches are a simple yet beautiful way to show thoughtfulness without relying on store-bought packaging. Each one carries a bit of personality, care, and creativity. With minimal supplies and no sewing required, this craft is accessible to anyone, whether you’re a seasoned crafter or just getting started.
I find myself turning to this project over and over again. It’s versatile, satisfying, and incredibly fun. Whether you’re preparing party favors, teacher appreciation gifts, or small tokens of love, a handmade pouch elevates the experience. Try making one today, and you’ll discover just how rewarding it is to give something made by hand, from the heart.

GIPHY App Key not set. Please check settings