

 Z
Z
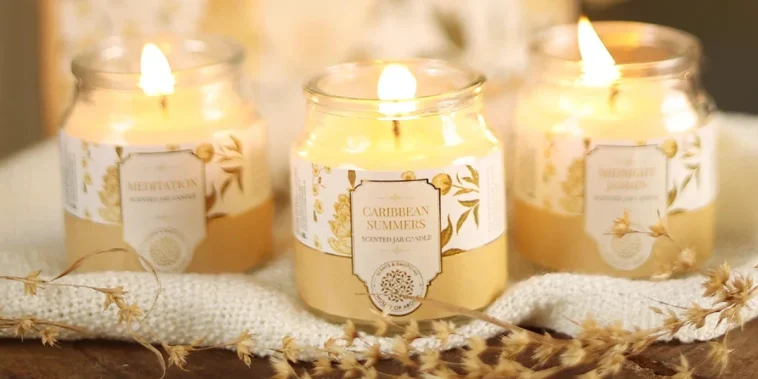
Making candles at home has become one of my favorite ways to create personalized and thoughtful gifts. Not only is it a relaxing and creative process, but the finished product is something people can enjoy in their homes day after day. When I learned how easy it is to make DIY candle gifts with essential oils, I knew I’d found the perfect craft that combines beauty, function, and aromatherapy all in one.
What makes DIY candle gifts with essential oils extra special is the ability to craft scents that evoke mood, memories, or simple serenity. Each blend tells a story, whether it’s a lavender-scented candle meant for relaxation or a citrusy blend to energize and uplift. I love experimenting with different combinations and pouring them into unique containers to match the personality of the person I’m gifting.
In this guide, I’ll walk you through everything you need to know about making your own candles using essential oils, from choosing wax and wicks to scenting, decorating, and packaging your finished gifts.
Supplies You Will Need
Before diving into the process, I like to gather all my supplies in one place. This makes the entire experience smoother and more enjoyable. Here’s what I use when making DIY candle gifts with essential oils:
- Soy wax flakes or beeswax
- Candle wicks, pre-tabbed for easier handling
- Wick stickers or hot glue for securing wicks
- Heat-safe containers such as mason jars, tins, or teacups
- Essential oils of your choice
- A double boiler or a heat-safe bowl over a pot of boiling water
- A thermometer
- Wooden skewers or clothespins to hold the wick in place
- Labels, ribbons, dried flowers, or twine for decorating
- Optional colorants like candle dye or mica powder
I prefer soy wax because it burns cleanly and holds fragrance well, but beeswax adds a natural honey scent that some people love. The type of wax you choose can subtly impact the final aroma of your candle, so I often test different blends.
Preparing the Containers
Clean, dry containers are the best starting point for any candle. I wash each jar or tin thoroughly and dry them completely. Then, I attach the wick to the bottom center of the container using a wick sticker or a dab of hot glue. I press it down firmly and use a clothespin or chopsticks across the top to keep the wick centered and upright.
The container is not just practical, it’s part of the gift. I love finding unique vessels like vintage teacups, colored glass jars, or reusable tins. They add character and charm to the gift and make it feel more personal.
Melting the Wax
Once the containers are ready, I move on to melting the wax. I measure the amount of wax I need by loosely filling each container twice, then pouring the wax into the top of my double boiler. Using a thermometer, I keep an eye on the temperature as the wax melts gently, stirring occasionally with a wooden stick.
Wax should be melted slowly over medium heat to prevent scorching. When it reaches about 170 to 180 degrees Fahrenheit, it’s ready for the essential oils to be added.
Adding Essential Oils
This is my favorite part of the process, choosing and adding the scents. The right essential oil blend can transform a simple candle into a therapeutic experience. I typically add about 30 to 50 drops of essential oil per 8 ounces of wax, depending on the strength of the oil and how fragrant I want the candle to be.
Some of my go-to blends for DIY candle gifts with essential oils include:
- Relaxation blend: lavender, chamomile, and bergamot
- Energy boost: sweet orange, lemon, and peppermint
- Holiday warmth: cinnamon, clove, and vanilla
- Romantic vibes: ylang ylang, sandalwood, and rose
- Fresh and clean: eucalyptus, tea tree, and spearmint
I stir the essential oils into the melted wax thoroughly to ensure the fragrance is evenly distributed. The wax should cool slightly before adding the oils, ideally around 160 degrees Fahrenheit, so the scent doesn’t burn off.
Pouring the Candles
With the essential oils blended in, I carefully pour the wax into each prepared container, filling to about half an inch from the top. I make sure the wick stays centered and doesn’t shift during pouring. If I’m adding decorative touches like dried flowers or herbs, I wait until the surface begins to set slightly so they stay suspended near the top.
Once poured, I leave the candles undisturbed for several hours to cool and harden completely. It’s important not to move them while they’re setting to avoid uneven tops or cracks.
Trimming the Wick
After the candles have hardened, I trim the wick down to about a quarter inch. This helps ensure a clean, even burn and prevents smoke. A long wick can cause the candle to burn too fast or produce soot, so I always double-check this step before packaging.
I also test one of the candles to make sure the scent throws well and that it burns cleanly. If the scent is too weak, I’ll adjust the amount of essential oil in the next batch. It’s all about trial, error, and learning what works best.
Decorating the Candles
The fun doesn’t stop once the candle is made. I like to dress up each gift to make it extra special. Here are a few simple ways I add finishing touches:
- Tie a piece of twine or ribbon around the jar
- Add a handwritten label with the scent name and burn instructions
- Attach a tag with a message like “Made with love”
- Press dried flowers onto the lid or jar with a dab of glue
- Place the candle in a small box with tissue paper for gifting
For holiday gifts, I’ve added pinecones, cinnamon sticks, or mini ornaments. For birthdays or weddings, I’ve used personalized labels with the recipient’s name. These little extras turn a handmade candle into a thoughtful presentation.
Creative Scent Ideas by Season
When making DIY candle gifts with essential oils, I like to tailor my scents to the season or event. It adds relevance and makes the gift feel even more timely.
Spring:
Lavender, lemon, and rosemary
Jasmine and grapefruit
Geranium and bergamot
Summer:
Lime, coconut, and mint
Orange and basil
Lavender and eucalyptus
Autumn:
Cedarwood, orange, and cinnamon
Vanilla and nutmeg
Cardamom and clove
Winter:
Pine, peppermint, and fir
Frankincense and myrrh
Cinnamon and sweet orange
These combinations can evoke memories, shift moods, or simply make a space feel warm and inviting. The power of scent is subtle but profound, which is why essential oils are so rewarding to work with.
Batch Gifting and Custom Sets
When I’m crafting for the holidays or preparing multiple gifts at once, I make candles in batches. This saves time and ensures consistency. I pour several candles at once, using different essential oil blends so I can offer variety.
I’ve created gift sets that include two or three mini candles with different scents, packaged together in a box. I label them with names like “Morning Light,” “Evening Calm,” and “Woodland Walk.” These sets make lovely gifts for teachers, coworkers, or neighbors.
I also include a small card with burn instructions and safety tips. For example:
- Trim the wick before each burn
- Burn the candle for at least 2 hours the first time to prevent tunneling
- Keep away from drafts and out of reach of children
These small details show care and thoughtfulness, and they make the gift feel complete.
Eco-Friendly and Reusable Ideas
Part of what I love about making DIY candle gifts with essential oils is how easy it is to keep them eco-friendly. I use reusable containers and avoid synthetic fragrances. When I give a candle in a glass jar or tin, I suggest the recipient reuse it for storage once the candle is gone.
I’ve also experimented with refill kits, where I provide a small bag of wax flakes, a new wick, and instructions for refilling the candle themselves. This creates a more sustainable cycle and encourages creativity in others.
Why Handmade Candles Make Meaningful Gifts
There’s something universally comforting about the glow of a candle. Whether it’s used during a bath, while reading a book, or to add ambiance to a dinner table, candles are gifts that bring calm and beauty to everyday life.
When made with essential oils, they offer even more, aromatherapy benefits, natural scents, and a connection to the care that went into crafting them. DIY candle gifts with essential oils are not only budget-friendly and customizable, but they also carry a bit of soul. They show that you spent time thinking about the person, choosing scents that might soothe or inspire them, and creating something with your own hands.
Final Thoughts
Learning to make DIY candle gifts with essential oils has been one of the most satisfying creative projects I’ve ever taken on. It’s easy to get started, even with just a few supplies, and the possibilities for customization are endless. Whether I’m crafting one for a friend’s birthday, building a holiday gift box, or just adding a handmade touch to my home, these candles bring light, fragrance, and warmth into every corner of life.
If you’ve been looking for a simple but heartfelt way to show someone you care, start with a jar, some wax, and a few drops of essential oil. You’ll be amazed at how much joy a small, flickering flame can carry.


GIPHY App Key not set. Please check settings