

 Z
Z
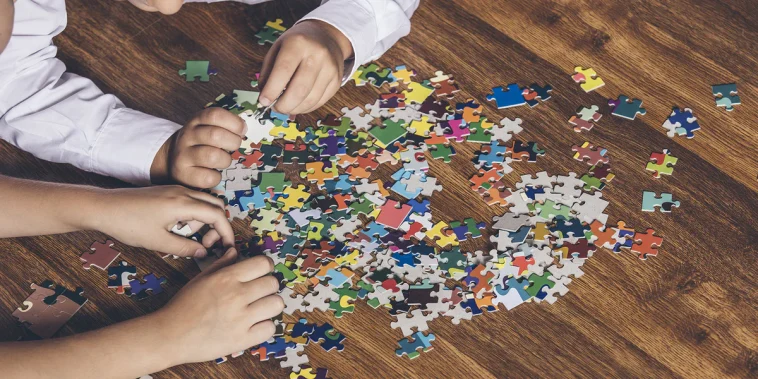
DIY puzzle gifts using your own photos are some of the most sentimental, creative, and truly personalized gifts I’ve ever made. Whether I’m celebrating a birthday, an anniversary, or a special moment with friends or family, turning a meaningful photo into a custom puzzle adds a fun and emotional touch to any occasion.
Puzzles offer the perfect blend of relaxation and nostalgia. When the image is one you picked yourself, the experience of putting it together becomes more personal. I love watching someone’s face light up as they recognize a familiar scene or a cherished memory, one piece at a time. It’s the kind of gift that turns into an activity, then becomes a keepsake that they can treasure or even frame afterward.
Making DIY puzzle gifts using your own photos is surprisingly easy. You don’t need to be a professional designer or have fancy equipment. With a good-quality print, a few basic tools, and some creativity, you can turn an ordinary photograph into a hands-on, interactive, and memorable present.
What You Will Need
I start every project by gathering the necessary materials. Most of what I use can be found at home, in a craft store, or ordered online. Here’s what I usually prepare:
- A printed photo on glossy or matte photo paper
- A blank puzzle board or cardboard
- Scissors or a craft knife
- Mod Podge or other decoupage glue
- A paintbrush or foam brush
- Pencil and ruler
- Puzzle template printed on paper or stenciled onto cardboard
- Optional: clear acrylic sealer spray
If you have a home printer, you can print the image yourself. Otherwise, I often get mine printed professionally to ensure the photo quality is sharp and vibrant.
Selecting the Right Photo
When making DIY puzzle gifts using your own photos, the choice of image matters a lot. I like to pick a photo that evokes emotion, sparks a memory, or is just visually striking. A few photo ideas that work really well include:
- Family portraits or group shots from a reunion
- Vacation photos with colorful scenery
- Couple photos for anniversaries
- Kids or pets in playful moments
- Personal artwork or hand-drawn illustrations
- Collages of several small photos
I always check for clarity and contrast. Images with too many dark areas or overly complicated backgrounds can make the puzzle harder to enjoy, especially if it’s for kids or older recipients. Brighter, more detailed images with clear focal points tend to work best.
Preparing the Puzzle Base
To make sure the puzzle is sturdy and long-lasting, I mount the photo onto a firm surface. I often use pre-cut blank puzzle boards made of chipboard or wooden sheets, but a piece of recycled cardboard also works well if I want to cut costs.
After trimming the photo to match the board’s size, I apply a thin, even layer of Mod Podge to the board using a foam brush. Then I carefully place the photo on top, starting at one end and smoothing it as I go to avoid air bubbles. A ruler helps press the image flat from the center outward.
Once the image is perfectly positioned, I let it dry for about 30 minutes. Then I brush another thin layer of Mod Podge over the top to seal the photo. This gives it a slight sheen and helps protect the surface from scratches and fingerprints.
Drawing or Printing the Puzzle Grid
To break the image into puzzle pieces, I need a template. I sometimes print a standard puzzle grid on regular paper and lay it on top of the photo to trace. Other times, I draw the pattern freehand, especially if I’m going for a more whimsical or non-traditional design.
For beginners or for kids, I recommend simple grids, like 3×3 or 4×4 squares. For adults or more advanced puzzlers, I use more complex interlocking shapes. There are plenty of free puzzle templates online that can be scaled to match your image size.
After placing the template over the sealed photo, I trace the pattern lightly using a pencil. I don’t press too hard to avoid marking the image.
Cutting the Puzzle Pieces
Cutting the puzzle is the most detailed step. I usually use a sharp craft knife or precision cutting tool, especially for complex shapes. A metal ruler helps guide straight lines for simpler grids.
If I’m using chipboard or wooden backing, it takes a little more pressure and patience. I take my time and make sure each piece has smooth edges and fits well with its neighbors. For curved or interlocking cuts, I switch to scissors for easier maneuvering.
Once the cutting is complete, I separate the pieces and gently sand any rough edges if needed. Then I test the puzzle by putting it together myself to make sure all the pieces work correctly.
Decorating the Puzzle Box or Packaging
Presentation matters almost as much as the puzzle itself. To elevate the experience, I package each puzzle in a thoughtful way. I’ve used small boxes, drawstring fabric bags, or even tins with clear lids. Here are a few things I often add:
- A printed version of the photo for reference
- A card with a handwritten message
- Instructions or a title like “Our Best Trip Ever” or “Family Fun Puzzle”
- Decorative wrapping or ribbon to make it gift-ready
Sometimes I attach a small frame or magnetic strip so the recipient can display the finished puzzle. It’s a nice way to turn the gift into something long-lasting.
Unique Variations You Can Try
One of my favorite parts of making DIY puzzle gifts using your own photos is exploring all the ways to get creative. Here are a few variations I’ve enjoyed making:
Shaped puzzles
Instead of a square or rectangle, I’ve made heart-shaped and circular puzzles by trimming the base beforehand and adjusting the template.
Mini puzzles
For party favors or stocking stuffers, I create puzzles using wallet-size photos and very simple grids. These only take a few minutes to cut and assemble.
Giant puzzles
Using poster-sized prints, I make large-scale puzzles for kids or events. These can be done on foam board or even on floor tiles.
Secret message puzzles
I’ve combined a photo with a hidden message or date layered underneath the picture. Once the puzzle is assembled, the message is revealed.
Puzzle plus frame
For a more permanent keepsake, I gift the finished puzzle already framed, with the option to take it apart and rebuild or keep it displayed.
Great Occasions for Photo Puzzle Gifts
DIY puzzle gifts using your own photos fit beautifully into nearly any celebration. Because they’re so versatile and personal, I’ve made them for:
- Anniversaries: A couple’s photo from their wedding or favorite vacation
- Birthdays: Childhood memories or funny moments captured in a snapshot
- Graduations: A photo of the graduate with friends or in their cap and gown
- Valentine’s Day: A romantic portrait puzzle with a sweet message
- Mother’s Day and Father’s Day: Family portraits or collages of special moments
- Christmas: Family holiday pictures or themed images from past years
I’ve even created puzzles as wedding invitations or baby announcements. Instead of just sending a photo, I turned the moment into a fun surprise to assemble.
Tips to Make the Process Easier
Over time, I’ve picked up a few helpful tips that make the whole project smoother and more successful:
- Print your photo slightly smaller than your base to avoid edge overlap
- Always test your cutting tools on a spare board first
- If your photo paper is thin, use heavier backing to prevent bending
- Use a light sealer over the finished puzzle to protect from wear
- Store extra pieces in a small labeled bag just in case any get lost
- Trace and cut slowly, precision is more important than speed
These small habits help the final puzzle feel professional and durable.
Making It Extra Special
Beyond just the puzzle itself, I like to add details that make the gift even more meaningful. One idea I’ve used is writing a message on the back of each puzzle piece. As the person assembles it, they discover a note or memory related to that section of the photo.
I’ve also used photo editing software to add text or quotes directly onto the image before printing. A favorite lyric, an inside joke, or a motivational phrase gives the puzzle extra depth.
If I’m giving the puzzle to kids, I sometimes turn it into a scavenger hunt where solving the puzzle reveals the next clue or small surprise. It makes the gift interactive and keeps the fun going.
Why This Gift Stands Out
DIY puzzle gifts using your own photos stand out because they engage the heart and the hands. They’re interactive, thoughtful, and completely unique. In a world full of quick buys and generic items, giving a puzzle made from a memory tells someone that you really took the time.
They also bridge generations. I’ve seen grandparents light up at puzzles featuring old family photos and kids get excited over puzzles showing them at play. The act of putting together a photo makes that memory come alive again.
And unlike store-bought puzzles, no two are the same. Every one I make is a reflection of a shared moment, a story, or a feeling. That personal connection is what makes it so special.
Final Thoughts
Making DIY puzzle gifts using your own photos is more than just a fun project, it’s a chance to revisit your favorite memories and turn them into something that can be touched, shared, and treasured. With a little time and a handful of tools, you can create a gift that combines playfulness with sentiment, creativity with love.
Whether it’s a quick mini puzzle for a friend or a detailed masterpiece for a milestone celebration, photo puzzles bring people closer, one piece at a time.

GIPHY App Key not set. Please check settings