

 Z
Z
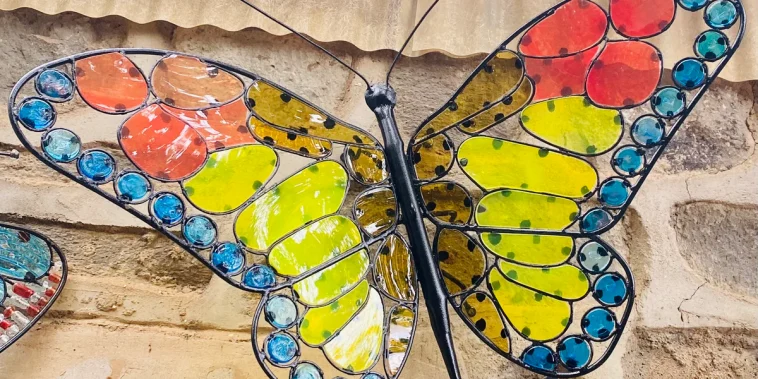
One of my favorite creative outlets has become painting on glass. There’s something magical about transforming an ordinary mason jar, wine glass, or even an old windowpane into a piece of art. Whether it’s for home decor, thoughtful gifts, or personal expression, glass painting gives me a canvas that’s both elegant and versatile. The transparency, the shine, and the way paint reacts on glass make it unlike any other surface I’ve worked with.
Over time, I’ve developed a system that helps me get vibrant, lasting results. This guide is all about what I’ve learned, tools I use, the process I follow, and the small tips that make a big difference.
Why I Love Painting on Glass
Painting on glass allows me to personalize everyday items. From colorful floral vases to intricate holiday ornaments, glass painting gives me a unique way to make custom creations that stand out. It works well for seasonal projects, table centerpieces, hand-painted candle holders, and decorative jars for gifting homemade treats.
The surface of glass demands precision and care, but it rewards patience with beautiful results. Once I got the hang of it, I found it hard to stop. Even old picture frames or upcycled bottles became opportunities to paint something unique.
Supplies I Use for Glass Painting
Getting started doesn’t require a huge investment. Here’s a rundown of the tools and materials I rely on.
Glass Items
I pick up plain glass items from thrift shops, dollar stores, or my kitchen cabinets. Wine glasses, jars, vases, plates, and picture frames are some of the most forgiving items to start with. The flatter and smoother the surface, the easier it is to paint on.
Paint
Not all paints are created equal when it comes to glass. I use either enamel-based paints or acrylic paints specially made for glass surfaces. Enamel paints are more durable and tend to resist wear better, while glass-specific acrylics are easier to clean and faster to dry.
Brushes
I use soft, fine-tipped brushes for detail work and larger flat brushes for background color. Foam brushes are helpful for applying base coats or even strokes on wider surfaces. The smoother the brush, the less streaking I notice on glass.
Palette and Water Dish
Because paint consistency can affect the outcome, I always have a palette and water on hand to thin or blend colors as needed. A small ceramic plate or tile works well as a mixing surface.
Tape and Stencils
Masking tape helps with sharp lines or dividing sections of the design. I also use reusable stencils for patterns like stars, mandalas, or lettering. For lettering, adhesive vinyl makes a great one-time stencil option.
Rubbing Alcohol
Before painting, I clean the glass surface with rubbing alcohol. This step removes fingerprints, dust, or oils that can interfere with paint adhesion.
Prepping the Glass Surface
Every painting project begins with proper prep. This step matters more with glass than with any other surface I’ve worked on. I start by washing the glass item with warm soapy water and drying it completely. Then I go over the surface again with a lint-free cloth and rubbing alcohol to make sure it’s squeaky clean.
If I’m using a stencil or masking tape, I wait until the glass is totally dry before applying anything. Once I have a clean and stable base, the painting can begin.
Techniques That Work Well
Painting on glass has its own rhythm. Unlike canvas or wood, paint doesn’t absorb into the surface. Here are a few techniques I’ve come to rely on.
Layering Lightly
Since glass is smooth and nonporous, heavy coats of paint can slide or streak. I work in thin layers and let each coat dry before adding the next. It might take two or three passes to get the vibrancy I want, but the results are smoother and more durable.
Dabbing Instead of Brushing
For designs that need texture or solid coverage, I use a dabbing motion rather than brushing. A sponge or stiff-bristled brush helps here. This technique gives a stippled effect and helps avoid streaks.
Outlining First
When painting detailed designs like flowers or animals, I sketch an outline in a water-soluble marker on the outside of the glass or use a stencil underneath. This way, I can follow the lines with a steady hand without marking up the painting surface.
Dot Painting
I use the back end of a brush, a stylus tool, or even a toothpick to make precise dots. This technique works great for mandala-style art or decorative borders. The dots look like tiny beads once dry and add an elegant touch.
Reverse Painting
One of the most fascinating ways to paint on glass is the reverse painting method. I paint the design backward on the underside of a glass plate or frame. This way, when the item is flipped over, the image is visible through the glass. I paint the topmost details first, then work backward to the base layers.
Drying and Curing the Paint
Once I finish the design, drying becomes essential. I always follow the manufacturer’s guidelines for dry time. Many glass paints feel dry to the touch within an hour, but I let them cure for a full 24 hours.
For long-lasting durability, I often cure the painted glass in an oven. I place the item in a cold oven, heat it to 350°F, then bake for 30 minutes. After that, I let it cool inside the oven. This process helps the paint become dishwasher-safe and more resistant to scratches.
Sealing the Design
If I’m not baking the glass or if I’ve used standard acrylics, I apply a sealant to protect the design. Clear acrylic spray or brush-on sealers work well. I always test the sealant on a small area first to make sure it doesn’t react with the paint or cause it to smear.
Common Mistakes I Avoid
Over time, I’ve learned a few lessons that have saved both time and materials:
- Skipping surface cleaning: Oil or dust prevents proper adhesion, so I never skip the alcohol wipe.
- Touching the painted surface too soon: Even if it looks dry, it might still smudge. I let it sit overnight before handling.
- Using the wrong brush: Cheap or stiff brushes can leave streaks. I invest in a few quality synthetic brushes for a smoother result.
- Not reading paint instructions: Some paints are air-dry only, others need curing. Knowing which type I’m working with helps avoid surprises.
Project Ideas That Make Great Gifts
Painting on glass opens up so many possibilities for handmade gifts. Here are some of the projects I’ve given to family and friends:
- Hand-painted wine glasses for birthdays or weddings
- Floral vases with seasonal designs
- Decorative plates with quotes or monograms
- Holiday ornaments using glitter and metallic paints
- Glass jars turned into tea light holders
- Personalized mugs with names or inside jokes
I’ve even painted a mirror with an intricate vine pattern along the edge and gifted it for a housewarming. The shimmer of paint on reflective surfaces is always striking.
Where I Find Inspiration
Whenever I want a new idea, I turn to nature, greeting cards, or seasonal decor. Pinterest is great for layout and motif ideas. I also browse color palettes on design sites or fabric patterns when I’m feeling stuck. Sometimes I sketch a few doodles on paper before committing them to glass.
Tips for First-Time Glass Painters
For anyone starting their first painting on glass project, here’s what I would suggest:
- Start with something simple like polka dots, stripes, or hearts
- Practice on an old jar or glass bottle before moving to your final piece
- Let each layer dry completely to avoid mixing colors unintentionally
- Keep a steady hand by anchoring your wrist on the table as you paint
- Use a lazy Susan to rotate the piece easily while painting
Glass painting isn’t hard, but it does take a steady hand and a little patience. The results, though, are worth every bit of effort.
Cleaning and Maintenance
Once a glass item is painted and sealed, I treat it gently. I usually recommend hand washing rather than putting it in the dishwasher, even if it’s oven-cured. If the item is decorative and not for food or drink use, I just dust it regularly with a soft cloth.
Final Thoughts
Learning the ins and outs of painting on glass has made me appreciate just how much potential lies in everyday objects. I’ve turned plain jars into luminaries, upcycled old windows into painted signs, and given friends keepsakes that feel one-of-a-kind. It’s a calming, rewarding process that results in gifts with a personal touch.
The clarity and elegance of glass, paired with vibrant paint, make each project shine. Whether you’re painting florals, mandalas, holiday scenes, or simple lettering, the possibilities are endless. Painting on glass is a craft I know I’ll return to over and over again.

GIPHY App Key not set. Please check settings